Desert Online General Trading LLC
Dubai, United Arab Emirates
Desert Online General Trading LLC
Dubai, United Arab Emirates


🔧 Revive Your Surfaces with Confidence!
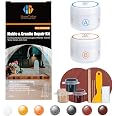
The Granite and Marble Repair Kit is a comprehensive solution for restoring chips, cracks, and holes in various surfaces, including granite, marble, quartz, and porcelain. This DIY kit features a professional-grade epoxy resin that allows for precise color matching across a wide spectrum of shades. With its non-toxic and food-safe formulation, it ensures safety while being easy to use, making it accessible for everyone. Enjoy a long-lasting repair that can maintain its integrity for up to 10 years, saving you money on costly replacements.


S**Y
Easy to use, looks good
I had to use this twice and it worked great. You wouldn't know there was ever a chip in the counter. My counters are mostly black so I can't speak to color mixing.
R**T
It Works
Crack in granite came with paint mix color. Filled crack as described. Did the job is it perfect no but better than before. Quality product.
H**D
Preliminary Review: Misleading Quantity Listed!
I have not used the product yet; just received and inspected. The product listing says more than 7oz weight. That was far more than I needed so I ordered it anyway.I was very surprised to find only two 50g containers (resin and hardener)! That's just over 3.5 ounces. The product weight listed must be gross weight. If you look closely at the box front image (lower right) it says 3.7 oz net, this must include the pigments. If I had thought to look at one of the listing pictures they DO list the 50g amount there - and only there!I need just over 3.5 oz to set seams on a reclaimed quartz countertop I'm installing. So I HOPE this will be enough. That's cutting it way too close for comfort! But I have hopes it will work...I will update my review when installation and curing is complete. Until then be aware of the ACTUAL quantity you are purchasing!The product seems fine. If other reviewers report it not setting hard, they probably did not add enough hardener. The 1:1 ratio is very important! If you're going to deviate from a perfect 1:1, make sure you add just a little MORE hardener than resin. Do it the other way round and it will NEVER set. And make sure there is no dust in the application area. It will bond to the dust and not so much the counter, which is of little help :)
W**N
AVery difficult to match color. Otherwise good product.
Very difficult to match color. Otherwise good product.
D**Y
Saved me $$$
Great product if you are patient and careful this was bought as a temporary fix to a completely broken counter top, No it wont completely hide the break but if you get a close color match you can pass it off as a natural fault in the stone and I'm happy enough for it to be a more permanent fix and it's saved me $$$ would use again but hope not to have to 😉
L**.
Black countertops
Ok this product works very well just follow directions…BUT if you have a black countertop, note if you sand the epoxy, you won’t be able to get it black. Sanding it makes it lighter. So I scraped mine off and tried again. After about 30 minutes to an hour it should still be moldable. I used various things paper towels, paint brushes, knife, etc to get the texture I wanted without sanding and then let it finish drying. I did not sand it and it remained the color I mixed. However fyi it will dry glossy. Be very patient and meticulous. I think it turned out well and is actually even less obvious in person. My countertop is Neolith.
A**I
Under no circumstances buy this producy
Absolutely the worst product to use. If I could give this "no stars" I would. The two part epoxy is white so forget getting a black, with some effort you might get a dark gray. To mix small amounts you have to guess what a 1 to 1 ratio is and you'll get it wrong which means it will not harden correctly or will not adhere correctly. I'm sure there is a third option but I gave up. I don't even want to go through what it takes to mix correctly. Be sure you have Goof-Off or some similar product on hand to clean up the mess you will make. A complete waste of time, money and energy.
T**R
Great Product
The picture attached is pretty close but when you just in the kitchen, its unnoticeable unless you know it is there. I'm writing this review because I was having a hard time deciding on the product with all the good and bad reviews and my type of application for a kitchen counter. Ultimately, doing a lot of small color mixes and my wife's help with color we got a really close match. It goes on thin depending on timing. So 15-20 minutes after mixing it is still hard to press into a corner so I kept it on more than needed. As it dried up, lets say 1-2 hours it, it becomes more like putty. About an hour in, I pulled off the tape. 1-2 hours in, i used my finger to very lightly press down on the edges and conform it around the lip. The next day after it dried, I started to use their sand paper which was very difficult. I got my own 100 grit sand paper to get a much better finished product even with my counter. I still need to do some finishing work with higher grit but it looks very good so I don't know if i'll mess with it. When sanding I took extra care to not go past any edges too far, just enough to get the edge smooth. Good luck to you all out there. Taking the extra time to read comments, directions, do some test and play around a bit went a long way for a great finished product.
Trustpilot
1 month ago
3 weeks ago