

🔋 Power up your ride with stealth and style — no wires, no worries!
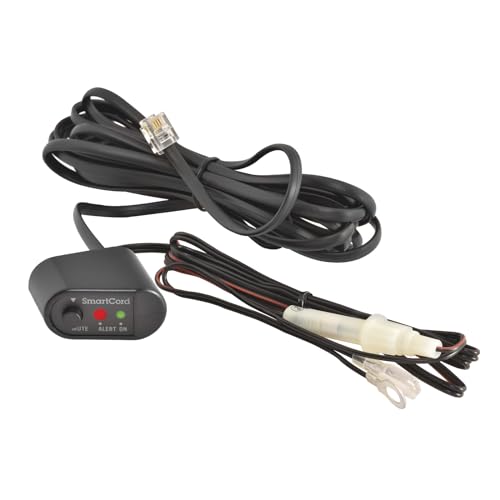
The Escort Direct Wire SmartCord is a 12V wired power cable designed to hardwire Escort radar detectors directly into your vehicle’s fuse box. Featuring LED power and alert indicators plus an inline mute button, it offers a clean, professional installation that frees up your 12V socket and keeps controls within easy reach. Compatible with a wide range of Escort models, this flat, durable cable hides neatly along your windshield for a clutter-free, high-tech driving experience.


| ASIN | B0003NN83K |
| Batteries Required? | No |
| Batteries included? | No |
| Colour | Black |
| Customer Reviews | 4.6 4.6 out of 5 stars (883) |
| Date First Available | 7 Aug. 2012 |
| Display style | LED |
| Item Package Quantity | 1 |
| Item Weight | 90.6 g |
| Item model number | 0010057-1 |
| Manufacturer | Escort |
| Part number | 0010057-1 |
| Power source type | Wired to Fuse Box |
| Product Dimensions | 3.81 x 7.62 x 18.29 cm; 90.72 g |
| Shape | Round |
| Special Features | Magnetic |
| Specification met | reach |
| Style | 001DWC-A |
| Voltage | 12 Volts (DC) |
J**L
I used this to direct wire my Escort radar detector into my 2013 Golf GTI. PROs - Easy to hard-wire your detector and remove the unsightly coiled cord that's hogging your 12v power socket. - Cables supplied with it are generously long, should be able to install a detector just about anywhere you need. - The cable to the detector is flat and easily squeezes into tight spaces around windshield to hide from view. - The controller is exactly the same as the SmartCord that came with the original detector and allows you to see the status of the device and remotely mute alerts. CONs - I wasn't a fan of the hook and loop fastener used to mount the SmartCord controller onto the car. It sticks well to both the car and the smart cord, but they feel like they're only loosely connect to each other. In reality it's never fallen off and I doubt it ever will, it just feels like an unprofessional mounting option. I would probably skip the hook and loop if installing again and just use some good double-sided tape. My install was easy and comprised of the following steps: 1. Determine the locations of the various components 2. Route the wires appropriately 3. Connect to power and ground Where is the fuse box? -- Driver's side, open the door and it's behind the panel in the center console. Where I wanted the radar detector? -- Horizontal center of windshield, several inches above the dash to give a clear line of sight to the rear window Where I wanted the control panel? -- I placed mine on the lower center console below and behind the steering wheel. This isn't exactly ideal as I can't see the lights as they're blocked from view by the steering wheel, but I can easily reach the Mute button by feel, and that's the most important feature for me. Routing the cables was surprisingly easy. The cord to the detector is flat and easily fits between pieces of trim so it can be hidden. I specifically placed the SmartCord control in a location that made it easy to route wires without removing trim panels. I fed both input power and detector output cords through the underside of the dashboard in the drivers foot well, and into the fuse box. I then routed the detector output lead up and out the top of the fuse box, around the bottom of the windshield pillar, and along the gap between the dashboard and the windshield until it reached the center. It took a bit of tugging along the path of the cable, but eventually I had enough length of cable to reach the detector and enough slack to allow me to hide it. I just poked the cable into the gap along the bottom of the windshield with my fingers, squeezed it between trim at the bottom of the pillar, and down into the fuse box. I had quite a lot of cable left over, but I'm sure all cars and locations being different they supply enough cable to cater to all. I just used electrical tape to tie up the excess cable and tape it down to the side of the fuse box to stop it rattling around. To connect to the power supply in my vehicle I used a Bussmann ATM Mini Circuit Converter (Add-a-Fuse) to expand an existing ignition-controlled fuse slot so that the detector only comes on when the ignition is on. The only tricky thing to be aware of is that these fuse adapters only work one way round, so if it doesn't work the first time you need to flip it around and try again. Finally I needed to connect the negative lead somewhere. Most (all?) vehicles run the battery negative feed throughout the entire chassis, so all you need to do is find a (non-structual) metal screw / bolt that can be used to attach the negative lead to the chassis. I also used a multi-meter set to continuity mode just to be doubly sure I had a valid ground connection. In my case the attachment point for the chassis was quite a way from the positive fuse connection, so I just split the power cable down the middle (it's built to do this, don't worry) until I had enough cable to route the negative feed to a valid mounting point. I'm very happy with this kit and so glad to have free access to my 12v power socket again.
R**K
Works like a charm! My car looks a lot cleaner now without the coiled wire hanging down to the AC power source. Easy to install, especially if you buy an "add-a-fuse" available on Amazon for just a couple of bucks. This prevents you from having to cut and splice. I recommend it!
A**R
Great product. My car looks great!!
D**N
Works perfectly for my 9500xi. I used this kit to hide the remote and the cords. Ended up flush Mounting the remote to a pannel in my car
S**D
This is great. Tossed my old coiled cable and wired this into a hidden wireless look. However, the end going to the fuse box was too short so I had to cut the ends off and attach extra wire. Manufacturer should not be stingy with the cord reaching to the fuse box, all of our autos are different. It works great though, go for it.
Trustpilot
2 weeks ago
1 month ago