⏰ Unlock the Power of Precision Timing!
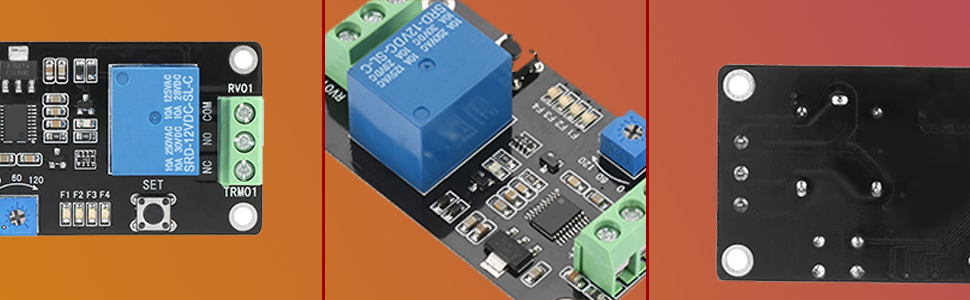
The DC 5V/12V/24V Delay Timer Relay is a versatile and reliable module designed for various control applications. With customizable delay settings ranging from 0.1 seconds to 120 seconds, it features self-locking capabilities, power protection, and memory retention for seamless operation. Ideal for professionals seeking efficiency and adaptability in their projects.
Brand | Vikye |
Model Number | Vikyezos7k2y3en-02 |
Product Dimensions | 5 x 4 x 2 cm; 20 g |
Power / Wattage | 240 watts |
Item Weight | 20 g |
Q**G
Well made.
I'm using this as a delay to power up a NEST camera, via USB, after a power disconnect. My NEST camera picks up WiFi from a mesh system WiFi extension at the bottom of my garden in a shed. There is a delay, after a power loss, for the mesh node to link to my WiFi and the NEST camera is not too clever to constantly try to get a WiFi connection as it appears to try only at power on and then does not connect and I have to manually remove power and apply again for it to connect to the valid WiFi signal at the mesh node.The board has a 12Volt relay but works on USB 5Volts and so I have replaced the relay with a 5Volt one. There is no circuit diagram.The board has an input (I connect to USB) and the input positive is connected to the common terminal on the relay so that power out via the relay occurs when the relay switches. Pressing a button sets the mode. Mode 1 is off for delay then activates the relay after the delay. The mode, selected by a push button, is shown on a bank of LEDs and will remember the mode even when power is removed.I set the delay to maximum and found with USB voltage the delay is about 90 seconds. The circuit does as designed and was more convenient to purchase than building one myself.I have now boxed this, sealed all with silicon that you put around baths as my shed gets damp, and my WiFi is on before the NEST powers up and the nest then connects to a valid WiFi after about 90 seconds from applied power.Looking good so far and inexpensive and working as planned
A**E
Great little timer
Very versatile, small and simple to use.No instructions but the combination of labels on the board and some experimentation (along with comments from others on these reviews) quickly got it working as needed. Very low power consumption.
M**T
Works fine, could be better designed but does the job
I needed this for a Citroën Dispatch as the 12v sockets often give spurious voltages when turning the ignition sending a charging phone or 4g dongle into a fit until I unplug and reinsert. The idea is I have a short delay for everything to settle and then it powers on.Note, I'm using this on a 12v adapter I installed at the rear and this module is only 10A so an appropriate fuse should be fitted (stock fuse on mine is 20A)The instructions can be confusing, so this is how I wired mine for the following conditions..I want power on (ignition), time delay (2s in my case) then my 12v socket to power on constantly until power is cut (ignition off).+ of 12v Socket goes to NO (Normally Open), recommend use of inline fuse.COM loops to DC+DC- goes to an appropriate ground (anything metal in a vehicle) or negative terminal of your power sourceDC+ goes to power source (again, recommend a fuse fitted somewhere or in my case connected to a spare slot in the fuse box)So there should be 2 wires going into DC+, one from the source and one from COM.I don't know how to incorporate the X1 signal but it isn't needed for my setup.One thing I don't like is that the DC+ and DC- terminals are so close together. Make sure not to short them with ill fitting or frayed wires especially if using in a vehicle and why a fuse between the 12v source and DC+ is essential.It's a bit fiddly to adjust the potentiometer for lower time values as the screw doesn't travel much but I managed to get mine from 0.5s to 2s eventually, an almost invisible adjustment knocks it on to about 10s so it doesn't take much.The rear of the board will need insulating if in a vehicle so it doesn't short on anything metalic
J**L
Amazing!
Great little device. Love the size and function. Have used it to delay a set of DRL on a car
M**K
Useless!!!
I bought 10 of these they failed to work . Absolute waste of time. Very dissatisfied
M**N
Cracking little board for the money but the instructions could be clearer. 12V supply.
Note, the listing is a bit unclear on supply voltage implying it will work on 24v but max input is 12V. You don't actually get any instructions with the boards so it is not clear at first how to set it up. The 4 modes are explained in the product listing and they do describe what each mode does. To set the unit up you need to do the following: When turned on for the first time it will probably be in mode 1 indicated by a flashing blue LED next to Function. To change mode press and hold the set button until the LED turns steady on, subsequent short presses will scroll through modes 2, 3, 4 and back to 1. To select the new mode press and hold the set button till the led flashes again. It is now in that mode and will stay in it even if powered off and back on. The mode time is set by the potentiometer . Modes 1 - Power on delay then relay latches on, high pulse on X1 repeats delay off latch on. Mode 2 - Power on relay latches for set time then goes off, high pulse on X1 repeats. Mode 3 - toggle on/off, high pulse on X1 toggles state on/off off/on. Mode 4 - Power on relay off, high pulse on X1 relay on for set time, if the input X1 stays high the relay will stay on.
S**E
Buyer beware
I bought this item expecting it to work at 5vdc as specified, but it did not.
A**K
Drl blackout with indicator signal module
The media could not be loaded. "Drl turn off with indicator signal"No instructions but the reviews will help with various tasks.The x1 is where the signal wire will go dc+ and negative is as is "but" you will need a piggy back wire from dc+ to com on the other end of the board as this is the relay feed port! Without it the relay/ board will not put power out! If you want to turn off the drl when the indicator is flashing connect to the NC port and your drl power to dc+. X1 will be your indicator signal. Adjust your timer accordingly (about 1/4 turn) and set to function 4. Hold the settings button down until constant light then press to scroll it along. Then press it and hold to set. It will steadily flash when it is set and stay in the function even after power is lost and reinstalled. Excellent and easy to do if you have a drl controller that flashes the drl in sync with the indicators and don't want it to do that but work like factory fitted should. PLEASE NOTE YOU WILL NEED 2 OF THESE TO WORK EACH SIDE INDEPENDENTLY.
Trustpilot
1 day ago
2 weeks ago