🔐 Hide it. Lock it. Forget it. Your valuables’ new best friend.
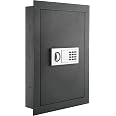
The Paragon In-Wall Safe offers 0.83 cubic feet of secure storage with a programmable electronic keypad and two manual override keys. Designed for easy installation between wall studs, it features a steel build, an anti-theft alarm that sounds up to 5 minutes after repeated incorrect code entries, and comes with anchor bolts and batteries included. Perfect for safeguarding money, jewelry, passports, and important documents at home or business.


| Brand | Paragon Lock & Safe |
| Product Dimensions | 4"D x 16.5"W x 22"H |
| Lock Type | Electronic, Key |
| Color | Gray |
| Capacity | 0.83 Cubic Feet |
| Material | Alloy Steel |
| Special Feature | Portable |
| Mounting Type | Wall Mount |
| Control Type | Touchpad Control |
| Included Components | Safe |
| Alarm | Audible |
| Water Resistance Level | Not Water Resistant |
| Chamber Depth | 14.25 Inches |
| Chamber Height | 20.25" Inches |
| Chamber Width | 3.75" Inches |
| UPC | 610708143918 |
| Global Trade Identification Number | 00610708143918 |
| Manufacturer | Trademark GLB |
| Part Number | 83-DT5913 |
| Item Weight | 30.6 pounds |
| Country of Origin | China |
| Item model number | 83-DT5913 |
| Batteries | 2 AA batteries required. (included) |
| Is Discontinued By Manufacturer | No |
| Size | Standard |
| Style | Classic |
| Power Source | Battery Powered |
| Item Package Quantity | 1 |
| Special Features | Portable |
| Batteries Included? | Yes |
| Batteries Required? | Yes |
| Battery Cell Type | Alkaline |
J**S
Good Safe
Just finished installing this wall safe. A few comments on the installation. There are no installation instructions but it's all common sense and there's a few You Tube videos out there to show you what to do. The safe itself fits exactly between two studs. IMO - Having a good stud finder made all the difference. I purchased a JAXWQ stud finder on Amazon and it worked great. Also, I added a 2X4 on the bottom for the safe to sit on while installing the screws into the studs. Use a level to make sure everything is straight. The safe is no frills but solid. Installing the batteries and passcodes was easy. So overall, there were no surprises on install which I appreciate. You really can't go wrong with this safe for the price point.
K**N
Tweaked for my needs
This is my second wall safe and I'm very happy with this one after making some adjustments.Comparing to the Stack-On PWS 15522, this one is cheaper but may be a bit more solid. It uses 6 bolts into the studs instead of 4. However, the Stack-On allowed me to turn off the button beeping without modifying it. I also found the Stack-On to have sturdier shelves.As for the Paragon 7725, the first thing to note is after unboxing, I tried the key with the safe flat on my table, the safe door facing up. The key didn't work until it was tipped upright. I almost thought I had a problem since I had read a review about the key not working.Installation was as expected. It fit easily between the studs which were just slightly wider than the safe width. I added a piece of 2x4 at the bottom to help with installation. I use a Kreg Mini Jig Pocket Hole Kit to attach to the studs on either side.The door had a little play to it which I found irritating when hitting the keypad if I didn't hold the door closed so I added a piece of 1/4" weather stripping to the inside of the door jamb, lengthwise. (photo attached)As many have noted, the beeping is too loud for my purposes. I didn't want to use a solder gun on the circuit board. Instead, I removed the cover to the circuit board and used a small screwdriver to carefully pop off the cover to the speaker (photo attached). Under the cap was a small metal piece which amplified the beep. With that removed, it made a very muted, barely audible beep when pushing the keypad buttons. This was perfect for me, although I realized I was proceeding at my own risk. Please proceed at your own risk if you attempt the same.Overall, great product for protecting a few small items out of sight.
R**N
Affordable quality.
I like this product. Probably not super armored but definately a theft deterant. It has 6 3/16" lags that security it within a stud bay. Most studs are on 16" centers so there is 14.5" inbetween in theory. This is almost never the case in reality so you'llBe happy to know that this wallSafe width is 14.25". Very thoughtful.I just found a stud near where I wanted the safe and cut into the area to the right and determined exactly where the opening between studs was. Then cut horizontally across until I reached the width of 14 3/8". Then Used a 2" level to plumb down 20 3/8". Used a level to get nice straight lines. Used a drywall saw to follow my layout lines. Set the safe in the hole and drilled pilots holes and then used an impact driver to set lags. The hex head is in metric. 5/16" is too small and 3/8" is just a hair too small. It was close enough that I could use the 3/8" socket to drive the lag in. Never done that in 10 years of contracting but it worked and I didnt have to track down a metric driver set or socket set.Easy to follow instructions. Simple to use. Batteries included. Pretty straight forward. Feels very secure.
A**1
Really decent safe, well made, needs some tweaks to be great
Solidly made safe, works well (after tweaking) $75, looks great - It's a 5/5. Some issues bring it down a notch.1. (This issue is a reflection on my house not the safe) American studding is 16" on center, which with 2" nominal (1.5") width, comes to 14.5" between studs. This safe is listed as 14.25" wide,, which should be fine, and I measured it as actually 14" wide which is even finer! But id did not fit and I spent over an hour notching one of my studs a full 1/4" working in the confines of the square I cut for the safe. Not fun, but its what I had to do. Others had similar problems and blamed the safe for being to wide. Maybe it could be another 1/4 narrower, but it should normally be fine.2. The combination setting. It comes with two (different) instructions for setting the combo. One set has glued on corrections, so that makes total of three different instructions. One set mentions setting two different combos, but it doesn't say how, nor is it possible to figure it out by trial and error. Going back and forth with the seller for 3 days yielded lots of wrong advise before somebody contacted the manufacturer and got the actual answer. here it is: after setting first combo, hit "0" twice, then red reset button, then 2nd combo, then "c" or "e", whicher one was NOT used yet. Worked!3. Door adjustment. No mention of this in the instructions. My door was almost impossible to open as it dragged on the bottom frame, and it had to be forced open by pulling hard on the handle. But since the handle is recessed and is tiny, and can only be grabbed with the tips of your fingers, it wasn't working well at all. The hinge pins are actually allen-headed bolts, and after adjusting the door upwards, it easily opens now, being propelled by the incorporated spring, now that it isn't dragging. Problem solved!4. Paint - mine was evenly painted and is very attractive. There was a minor chip where the door was dragging. Someone made a HUGE deal about this - so what? It isn't a $55,000 Lexus. And even that is subject to usual parking lot dings, etc. Yikes!
Trustpilot
5 days ago
2 weeks ago