Description
🛠️ Patch it like a pro, impress like a boss!
- MESS FREE APPLICATION - Designed to minimize cleanup and simplify your repair process
- LONG LASTING ECO FRIENDLY - Washable and reusable sponges built to last through multiple projects
- EFFORTLESS DIY TEXTURE REPAIR - Achieve professional knockdown finishes without calling a pro
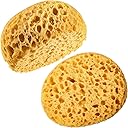
- PERFECTLY SIZED FOR PRECISION - Compact 13x15x6 cm sponges fit any small patch or ceiling spot
- VERSATILE FOR ALL KNOCKDOWN TEXTURES - Ideal for light, medium, and heavy textures on walls and ceilings
The Patelai Knockdown Texture Sponge (2-pack) is a durable, washable tool designed for DIY drywall and ceiling texture repairs. Sized at 13x15x6 cm, it blends seamlessly with existing knockdown textures—light, medium, or heavy—making it perfect for home decorators, handymen, and renovation pros seeking quick, mess-free fixes with professional results.