🖤 Upgrade your ride with premium protection and style — because your car deserves the best!
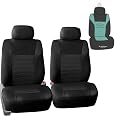
The FH Group Premium 3D Air Mesh Front Seat Covers offer a universal fit for cars, trucks, and SUVs, featuring airbag-compatible stitching, a handy storage pocket, and durable 3-layer polyester fabric. Designed for easy installation and machine washable maintenance, these black seat covers combine protection, style, and convenience for the modern driver.
Fit Type | Universal Fit |
Brand | FH Group |
Color | Black |
UPC | 196342002861 |
Manufacturer | FH Group |
Has Seat Belt Accessibility | Yes |
Automotive Fit Type | Universal Fit |
Item Weight | 1.55 pounds |
Product Dimensions | 15 x 11 x 3 inches |
Item model number | FB068102BLACK-AMZ |
Is Discontinued By Manufacturer | No |
Manufacturer Part Number | FB068102BLACK-AMZ |
D**S
Car covering perfection
Perfect fitMaterial strongColor vibrant
J**L
Looks Good Fits Nice
This is my third set of FH seat covers for my 2018 Sierra. I originally bought them to protect the original seats. No one knows that these are seat covers. They mesh perfectly with the front and sides of the seat. The only tell tale signs that they’re covers is the back. They are short of the back bottom by about 3-4”. No one notices that since you’d have to be sitting in the back seat to see it. My previous set( FH, but different model) lasted about 3 years. The same as the set previously. These cost a little more but I’m sure I’ll be getting at least another 3 years of seat protection. They’re easy to install and FH gives an air freshener with the order.
S**I
Affordable
Nice quality set. Not difficult to install and looks really nice. Love that this company even makes a matching set of armrest covers.
V**M
YOU GET WHAT YOU PAY FOR
The headrest covers are flimsy and I wound up throwing them away because my headrests are round and the covers were too large for them. The seats and back one piece is OK but a bit difficult to install. I needed my husband's help because I was struggling. They did not have a smell at all and look OK.
O**T
SUPER FIT ON GEN 1 (2004, 2005, 2006) SCION xB SEATS
PLEASE NOTE: QUALITY COMMENTS APPLY TO THE PRODUCT. INSTALLATION COMMENTS APPLY ONLY TO “GENERATION ONE” SCION xB’s (although the basic method may work well on other vehicle seats).I bought the black/gray set for my Siver 2006 Scion xB. They are about as perfect a fit as could be had without purchasing custom seat covers. The fabric, especially on the part you sit on and against, is of excellent/durable quality. Once they were installed it took a close look to realize that they were not the original seat upholstery. However, the headrest covers were not a very good fit. They were too wide and not angled like the headrests. If you are at all handy it is easy to get a custom fit with a little stitching and trimming (more later).In the Gen 1 Scions the front seats (on the door side) have a double metal side on them. I found that out quite by accident. First, the seat covering part attaches very conveniently – front to back (after you’ve slid the back covering part over the seat back – with the headrest removed) via webbing and buckles. That part of the installation could not be easier in this vehicle. BUT, the side to side tensioning is done by joining 4 elastic loops (in pairs of two). Threading (feeding/guiding) the 2 elastic loops on the door sides of the front seats (between the double layers of metal) is tricky. I mused over how to do it for several days before I struck on a solution. I used a cable tie like these (example: https://amazon.com/Harileminy-Self-Locking-Plastic-Strength-Resistant/dp/B074Q7129L/ref=sr_1_13?ie=UTF8&qid=1525399203&sr=8-13&keywords=PLASTIC+CABLE+TIES). If you look at the picture you can see a slot at the fat (receiving) end of the tie. Using (2 at a time) twist ties passed through that slot and fastening it to the elastic loop I was able to feed the cable tie easily between the 2 layers of metal on the sides of the seats. I did this to both loops on the door side, pulling the seat cover down behind the metal and thus leaving enough of the elastic sticking out below the seat to reach when attaching the loop from the (center) console side of the seats. Each time I needed to feed an elastic loop through the appropriate slot/place and under the seat I just released the previous loop of elastic from the twist-tie and twist-tied the next loop of elastic to the cable tie. I have never before been able to route elastic loops easily when I’ve installed seat covers. The project usually ends up being a “pain-in-the-neck” – literally – after standing on my head in foot wells or trying to stick my head and or arms under the car/truck/suv seats! The use of the cable tie was like magic!I took the headrests and the headrest covers in the house for ease of modification. I put one of the covers onto one of the headrests “wrong-side-out”. I pulled the excess fabric (evenly on both sides) outward from the headrest and used fairly small safety pins to pin the excess fabric tightly together. I then checked that I could still remove the cover and replace it easily (leaving it pinned). After checking that I again removed it and stitched it (by hand with 1/8th to 3/16th inch long) simple up and down stitches closely following where the pins were located. I then removed the pins and tried the cover on the headrest. It was a good fit except for the excess fabric “lumping” on the sides which I then trimmed off 1/8th inch from the running stitches. I then stitched another row of stitches the same length, going through the first row, but offset from the original stitches so that the fabric was pierced with a stitch every 1/16th to 3/32nds of an inch. I then whip-stitched the edges. This could also be done on a sewing machine if you use a ball needle and are experienced with sewing these types of fabrics. (I am an experienced machine sewer, but I preferred hand sewing because it was easier than trying to control the speed/stitch length/overcastting stitch, etc., on a machine.) I personally cut the elastic ties off of the headrest covers and used stainless steel 1-1/2” “T” pins (example: https://www.amazon.com/Stainless-Modelling-Brooch-Sewing-ShopIdea/dp/B078HQKYBR/ref=sr_1_1?s=hi&ie=UTF8&qid=1525402640&sr=1-1&keywords=sewing+%22T%22+pins) to hold the covers on – overlapping the elastic edges under the bottom of the headrest and pushing the pins in hard – totally. The pins are hidden from view when the headrest is installed (if you pushed them in all the way)!They headrest covers should be easy to unpin and remove for laundering when necessary just as the seat covers should be easy to remove for laundering! Things always come off easier than they went on – and now that you also know secrets for installing the seat covers re-installing them after laundering should be a breeze!Note: the "one minute" (no kidding) video by the manufacturer was too quick and so general and incomplete as to be useless. I did not watch the many "YouTube", etc., videos because I figured that installation would probably be vehicle specific in some ways and these weren't the first seat covers I'd installed.
C**H
FH Group Automotive Car Seat Covers Full Set Premium
These car seat covers were a perfect fit for my sister’s RAV4. Her upholstery was in excellent condition but I wanted to give her a gift and this seemed to fit the bill after she saw the seat covers I bought for my 2016 F250 Super Duty pickup. She was very happy and excited. She felt these covers were nicer looking than the original ones. I put them on for her and I had no issues at all. The instructions were clear and had pictures. Very happy with this purchase and would highly recommend. I used the Amazon vehicle guide to make sure the fit was right. I believe the price was reasonable as well.
S**Q
Stupid straps and hooks! They don’t work on my car! Returning them.
When are these cover makers going to make anchors (cylindrical), not straps, that you push through the front and back seats, an option?!!? These straps on the front seat can be pushed through, but they are unreachable on the back side of my car due to the seat back hiding them. Had it been those cylindrical anchors, it would have worked. So, these front seat covers were sliding all over the place, even with the straps under the seat, which also didn’t work on my 2024 Lincoln Corsair. Now, for the back seat covers: I was sent 2 covers with 3 zippers each, for the back, and NO covers for the back seat. What are you supposed to sit on? Just horrible, and a waste of my money! I’m returning them.
G**N
Took time, but looks good.
It took me some time because I did not fully understand the instructions on the backseat. They give you a zipper together piece of fabric that you use on a 60/40 split. I did not realize that after unzipping the fabric you use one on the 60 and one on the 40 side. It took me about two hours to get the whole car done because to do the backseat right you have to remove the bench and each of the back pieces. I also had to remove screws on the sides of the front seat plastic to be able to tuck it in around the cushion and tie it all together underneath. Looks good but fabric is kind of thin so I don't know how good it will wear.
Trustpilot
Hace 2 semanas
Hace 3 semanas