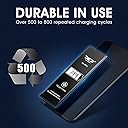
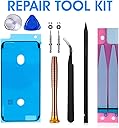
Buy DEJI Battery for iPhone 6, 2500mAh High Capacity Replacement Battery 0 Cycle, Professional Full Set Repair Tools Kit and Instructions: Batteries - desertcart.com โ FREE DELIVERY possible on eligible purchases Review: Awesome iPhone 6 battery replacement - Apple customer service told me to go purchase the battery at an Apple Store for $49 & they confirmed twice that I could install it myself at home, as I desired. I get to the store and they want to setup an appointment just to diagnose my old phone, with first available appointment was a one-hour wait time. I told them I only wanted to purchase the battery (as I 100% knew that was the issue) for my old iPhone (no thanks to Apple updates draining battery life on older phones) and that Apple customer service told me I could purchase the battery and install it myself. They tell me thatโs not true. The Apple store tells me I cannot simply โpurchaseโ a battery, and because of the โwarrantyโ they needed to install it for me. The 15-minute diagnostic was free, but depending on what they find, additional fees might apply to my $49 battery purchase with free installation. Thereโs no warranty remaining on my old iPhone, even THEY knew that. So I went on desertcart and I ordered this product for 1/3 the price, installed it myself with the directions & tools included, and referenced YouTube videos as needed; I was done in under 2 hours. Phone works great, battery is new, and havenโt had any other issues. If you have an older iPhone, my suggestion is donโt waste your time or money at the Apple store. Order it here. You wonโt regret it; I sure donโt. Doing it yourself is also good for self-praise and esteem. Youโre not incompetent...donโt let anyone make you feel like you need to pay THEM for something so basic & easy to install. Review: LONG battery life - My original iphone battery was over 3 years old and down to 79% capacity according to the iphone battery health. I had gotten used to obsessively plugging it in...but no more! After installation I let it drain to 0% as directed and then charged up to 100%. It lasted 43 hours from 100% to 0% with light to moderate use. Heavy users can expect it to last all day at a minimum since I almost got 2 full days! For the installation watch youtube tutorials (of course) and use duct tape to set the little screws on since you have to keep them from rolling around and getting mixed up. It took me 45 minutes to replace my battery, but then I also replaced my wife's battery on her iphone 6s , which took me 25 minutes since I knew exactly what to do the 2nd time around. The only thing I messed up was the adhesive strips which got stuck together when I unpeeled them causing them to bunch up, but I still used them and they're holding just fine. Just be very careful with the adhesive strips, they're a pain... Worth every penny since now we don't have to worry about getting new overpriced phones for another year or two. As a side note-you'll also learn how to replace screens through this process so if you ever get a cracked screen it's even less work than replacing the battery.
| Customer Reviews | 4.5 out of 5 stars 354 Reviews |
E**N
Awesome iPhone 6 battery replacement
Apple customer service told me to go purchase the battery at an Apple Store for $49 & they confirmed twice that I could install it myself at home, as I desired. I get to the store and they want to setup an appointment just to diagnose my old phone, with first available appointment was a one-hour wait time. I told them I only wanted to purchase the battery (as I 100% knew that was the issue) for my old iPhone (no thanks to Apple updates draining battery life on older phones) and that Apple customer service told me I could purchase the battery and install it myself. They tell me thatโs not true. The Apple store tells me I cannot simply โpurchaseโ a battery, and because of the โwarrantyโ they needed to install it for me. The 15-minute diagnostic was free, but depending on what they find, additional fees might apply to my $49 battery purchase with free installation. Thereโs no warranty remaining on my old iPhone, even THEY knew that. So I went on Amazon and I ordered this product for 1/3 the price, installed it myself with the directions & tools included, and referenced YouTube videos as needed; I was done in under 2 hours. Phone works great, battery is new, and havenโt had any other issues. If you have an older iPhone, my suggestion is donโt waste your time or money at the Apple store. Order it here. You wonโt regret it; I sure donโt. Doing it yourself is also good for self-praise and esteem. Youโre not incompetent...donโt let anyone make you feel like you need to pay THEM for something so basic & easy to install.
L**7
LONG battery life
My original iphone battery was over 3 years old and down to 79% capacity according to the iphone battery health. I had gotten used to obsessively plugging it in...but no more! After installation I let it drain to 0% as directed and then charged up to 100%. It lasted 43 hours from 100% to 0% with light to moderate use. Heavy users can expect it to last all day at a minimum since I almost got 2 full days! For the installation watch youtube tutorials (of course) and use duct tape to set the little screws on since you have to keep them from rolling around and getting mixed up. It took me 45 minutes to replace my battery, but then I also replaced my wife's battery on her iphone 6s , which took me 25 minutes since I knew exactly what to do the 2nd time around. The only thing I messed up was the adhesive strips which got stuck together when I unpeeled them causing them to bunch up, but I still used them and they're holding just fine. Just be very careful with the adhesive strips, they're a pain... Worth every penny since now we don't have to worry about getting new overpriced phones for another year or two. As a side note-you'll also learn how to replace screens through this process so if you ever get a cracked screen it's even less work than replacing the battery.
F**Y
Simple process BUT requires a little education before attempting...
This product is sold by people whose native tongue is not English. The instructions provided are good but it is very helpful to SEE the process. There are plenty of videos out there to show that but I think Scandia made the best one. Some things to emphasize: 1. Pay very close attention to what screw comes from what part of the phone. There are subtle differences between them and if you confuse them, no telling the result. I put a sheet of paper down marked with lines separating the various parts from one another by major step in disassembly (case, screen, battery) and laid the parts (screws and covers) for each in a zone marked off for them. I pre-set this paper AWAY from my work area a foot or so so as not to disturb the parts. 2. This is a complicated piece of electronics you are working on. So, work in an uncluttered area free of electro-static shock like stay away from a carpeted floor. 3. Have plastic tools IN ADDITION to the tools that are provided and are beefier than the ones in the kit. I have tools used for removing plastic parts (sold at any auto parts store and handy for other jobs like this one) in cars like door panels and dashboard pieces. These do not gouge things as easily and do not conduct electricity. I used at least two different plastic pry tools to remove the battery per the next step. 4. Using a hair dryer or hot air device makes removing the battery from the adhesive the holds it MUCH easier. Not too hot, but heat it little, pry a little, hit it with more heat and pry, heat and pry. The heat should be applied to the case not the interior components lest you melt them. And aim the heat at the case where the battery is. DO NOT do this part where you have all your intsy bintsy parts or you will BLOW THEM AWAY and life becomes depressing. 5. Per the Scandia video, know where and how to pry up the battery. Do not bend any part of it to dramatically lest it crack or more. Just pry a little all along the case edge starting at each corner being careful to not hit any ribbon connectors. Heat the back up again as things cool and continue prying from each corner little by little. It took about 3 minutes for me to get the battery out. 6. I was able to get the battery out this way and leave the factory tape in place. Before you put the new battery in, compare the connectors to one another to be sure they are the same. Once confirmed, the new battery drops easily in place in the little cradle made for it. 7. Finally, dont be in a hurry. Move methodically, carefully. Review the video any time you do not know exactly what to do next. 8. When it is all back together, hit the on button and pray. When the apple shows you are home free. Have fun!
B**.
Better than new!
Love the new battery, battery life is great! Overall easy to replace. The only hard part is removing the old glued in battery, that is a pain in the butt (even with heat). Well worth the time and effort. Saved $50 from what it would cost to take to a battery shop and have it done.
L**Y
Great battery easy to install.
First thing you need to do is check your model number in settings, general and about phone. Make sure your ordering the correct battery. Here are some installation tips. When you're taking out the old battery make sure you pull the tape strips out away from the phone parallel to the ground do not pull straight up or they will break and it is extremely difficult to get the battery out. When you're putting the new tape down it's much easier to stick it to the phone first and place your battery on top of the tape. Make sure the blue tags on the end of the tape are facing up towards your battery. You want the big ends of the tape to stick to the battery end and not your phone. It's also much easier to connect the new battery before permanently sticking it into your phone. I didn't do this and I thought I ordered the wrong battery because the connector is hard to get just right to snap in. I ended up having to push the connector towards my battery to get it to snap in right. remember when putting the connector cover back on, the little screw goes towards the edge of the phone and the bigger screw goes closer to your battery. There is not a alcohol wipe included to clean your screen you can use rubbing alcohol for this the higher the alcohol the better. I've done a lot of replacements for Android and iPhone this is a good quality battery. The pick is exceptional. it has a thick circle in the center of the pick and it makes it easier to use not only to pry up the screen but to disconnect ports as well it's one of my favorites. If the tape brakes when you're removing your old battery please look up a YouTube video on how to safely remove your battery when the tape breaks. The adhesive tape is really strong and you will most likely damage your phone trying to pry the battery out. Great quality repair kit I would recommend to anyone.
L**E
Didn't work at first, but kind email from seller gave good information plus savings
When I first installed the battery, it would not charge. Seller sent a great email to give me some things to look at. They told me to check connection. Took phone apart and used DMM to measure battery. It only had 0.3VDC. Usually a LiPo battery comes charge around 50%. This may be a sign of a battery that won't last long. Connect the battery up to an external power supply that could supply current. Ran at 3.0VDC @ 1.5A. The battery begin to charge. After about a minute, I connected to the phone. Plugged it into the Apple charger and it started to charge. Phone is now at 100% and seems to be working great now. We will see if the battery will last a year or two.
C**N
Better than new
Original OEM battery would lose charge with phone on standby (from 100% to 65% or so) in a couple of hours. This battery enabled phone (on standby with moderate use) to go from 100% to 80% in THREE DAYS. Don't know why I waited so long. Just make sure you remember which screws go where - as some of the screws on the plates holding down the phone's connectors (both battery and screen) differ in length. Otherwise it is a simple install. You may need a third hand (a wife is useful) to hold the screen vertical when reinstalling the plate holding down the four connectors attached to the screen. All the necessary tools are supplied with the replacement battery. This is the battery you want to buy.
G**N
Some things better left to the professionals
The instructions were clear and easy to follow. Tools supplied worked well. Battery lasted less than a year. Brought the phone to apple. Phone was completely dead. Would not charge. Apple said I probably shorted something out when I replaced the battery. Iโve come to realize that ALL phones are NOT designed to last past a certain point. Someone I work with called it โplanned obsolescence โ. Better off just getting a new phone when the battery shows signs that it canโt hold a charge anymore.
Trustpilot
4 days ago
5 days ago