Desertcart purchases this item on your behalf and handles shipping, customs, and support to Peru.
✨ See and be seen: Illuminate your drive with Meguiar’s brilliance!
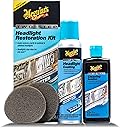
Meguiar's Two Step Car Headlight Restoration Kit offers a simple, drill-free process to remove oxidation and yellowing from headlights. Using a cleaning solution and abrasive pads followed by a protective coating, it restores clarity and improves nighttime visibility. The kit provides up to 12 months of protection against re-oxidation, backed by Meguiar’s 125 years of automotive care expertise.


| ASIN | B01M75GUJB |
| Best Sellers Rank | #2,994 in Automotive ( See Top 100 in Automotive ) #25 in Automotive Headlight Restoration Kits |
| Brand | Meguiar's |
| Brand Name | Meguiar's |
| Customer Reviews | 4.4 out of 5 stars 11,514 Reviews |
| Global Trade Identification Number | 00070382012632 |
| Included Components | Meguiar's G2970 Meguiar's Two Step Headlight Restoration Kit, 4 fl. oz, 1 Pack |
| Item Form | Cream, Spray |
| Item Highlight | Headlight Cleaner Restores Clear Car Plastic & Protects from Re-Oxidation, Includes Coating & Cleaning Solution, 4 Piece Kit |
| Item Type Name | Meguiar's - G2970 |
| Item Volume | 12.72 fluid ounces |
| Item Weight | 12.8 ounces |
| Manufacturer | Meguiar's |
| Material Feature | Fragrance Free |
| Material Features | Fragrance Free |
| Model Number | Meguiar's - G2970 |
| Number of Items | 1 |
| Part Interchange Info | G2970 |
| Part Number | G2970 |
| Product Benefits | Durable |
| Scent | Not specified |
| Size | 1 Count (Pack of 1) |
| Special Features | Durable |
| Specific Uses For Product | Head Lights |
| Surface Recommendation | Headlights, uncoated clear plastics |
| UPC | 070382012632 |
| Unit Count | 1 Count |
| Warranty Description | Manufacturer Warranty |
S**K
Good to have for restoring headlights
This Meguiar's kit is handy when your car's headlights start looking dull. i used it last weekend on my old car before a road trip, and it made a decent difference. the cleaning solution worked well to remove haze, and the coating kept them clearer longer. honestly, it’s simple to use and doesn’t take much time, which is nice. however, i thought the results could be a bit better on really oxidized headlights. also, the kit comes with enough supplies for a couple of treatments, so it’s economical. if your headlights are just slightly cloudy, this could be enough. but for deep oxidation, you might need something stronger. overall, it’s a helpful product for maintaining clearer visibility at night, especially before big drives.
J**G
Works great! Buy it!
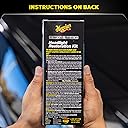
I was skeptical about it at first, but read reviews and saw some pics and figured I would give it a try. I did research on this and other products for my light covers restoration. The price was good and was slightly more than some other brands, but stuck with Meguiar's because of their products I've used before, and reading the simple instructions on the box. My vehicle is 8 years old, and needed the headlights to be cleaned up or replaced, but opted to try and clean them since they are expensive to replace. Anyways, the instructions are clear and easy to understand. Very straightforward. I did 3 applications of cleaner per headlight. It took maybe 15-20 minutes per lamp to scrub. I could tell a slight difference after the first application, so kept it going. I was very surprised and pleased with how well the cleaner worked and how my headlights now look. I can see the bulbs now! Lol. But they are so clear and shiny now, and the light shows much better since they've been scrubbed down. The only thing I would change about the product is to maybe add a pair of buffer pads for people that have more severe covers, or have additional vehicles to use the cleaner on. I'm not sure how well the pads would hold up with multiple uses, so it would be nice to have extra available for another vehicle or severe buffering. There is enough of the cleaning compound and sealant for at least 2 vehicles, maybe even 3, depending on the severity of the lamps that needed to be restored. But I have to say this product definitely works and would buy it again, and recommend it for anyone needing to restore their headlights. Check out the pics I've posted.
M**S
A big improvement to the headlights' lenses, but...
...it's not some miracle worker. The lenses will never be 'as new' as it became abundantly obvious in the end, despite all the care and effort I tried to implement when using this Meguiar's restoration kit. Try as hard and with as much care as I did, there was still some residual haze left over, though I must say that the lens covers looked MUCH better than the sorry hazed-over state that they had been in. While easy-to-use and apply in concept, a fair amount of elbow grease is a given with this solution, enough so that it had me thinking that a refinishing kit that requires the use of a power tool might have proven to be a more effective and efficient choice. But I must say that I was still quite pleased with the end result, as was my wife (the subject vehicle was her car, after all). No the headlamps don't look factory-new after the Meguiar's treatment. The yellowing is gone but the lenses are not crystal-clear as they once were all those years ago when the car was new and unused. But they do look far clearer than where they had been and the LED lighting that emanates from this Mazda's 13 year-old lamps haven't been this bright and clear in years. And of course it's far cheaper to revitalize the headlamp housings than to spring for all-new units, which by the way aren't particularly to install as a DIYer given how much of the car has to be taken apart in order to get the old headlamps out and the new ones in. Modern car designs do sometimes suck at times. It was worth the couple or so hours I spent scouring the lenses and masking the lights to prevent overspray of the clear spray coating that finishes the treatment. Despite not having a "perfect" end result, it's still good enough to merit 5 stars.
G**E
Good for busy parents’ cars
Getting this kit was my attempt to make our old minivan look less tired without paying a detail shop. The headlights had gone super cloudy from school runs and grocery trips. One Saturday while the baby napped, i took 20 minutes in the driveway and worked on just one headlight to test it. The yellow haze came off fast and it looked way clearer. My husband actually asked if I’d ordered a new headlight, which made me pretty glad I tried it. I like that I just wipe on the coating at the end so it doesn’t fade right away. If u have an older family car, this is handy.
M**E
Easy, quick, works very well
This stuff worked so well and so easily that I feel obligated to review it. I used a different product last year. It took quite a lot of time (about 2+ hours) and work to clean the plastic and then buff it back to something like a clear, glossy-ish surface that the headlight could shine through. It didn't really look good, the headlights were not very bright, and they yellowed again within six months. I picked this Meguiars product for my second try because of the protector solution, which appeared to do two things I wanted: a) it fills in the sanding scratches on the plastic lens and makes it shiny and transparent again without any buffing or polishing b) it will prevent the lens from yellowing again so quickly. I was totally right about the first one. You basically sand off the lens with one pad and the cleaning solution, taking off the yellow layer of the plastic and leaving it white, almost bluish, but totally obscured with fine scratches. Then you spray on the protector and the scratches get filled in, leaving the lens looking clear, like slightly wavy glass. It achieved this very well, and easily. Total time less than one hour, including waiting between coats. Didn't even have to rub very hard. I don't yet know about the second one. Too early to tell, it's only been 4 days. The protector has cured, the headlights look very clear, and they are definitely throwing more light on the road in front of me. I will just have to watch and see if they yellow. I will probably ask the manufacturer if it would help to refresh the protector periodically. In sum, I am very pleased with it, both ease of application and great results. I will try to remember to update this review after 6 months or a year, once I know something about the longevity of the application.
J**N
This will remove the factory UV protection. Don't use it unless your headlights really need it!
I naively bought this hoping to polish some light wear out of my otherwise clear headlights (3 year old Audi A5). But ultimately ended up worse off. If your headlights are cloudy, I assume this will greatly improve them. But it's trickier than I expected, and needs more thorough directions (not even their video is detailed enough). Lesson 1: If your headlights are still clear, all this will do is ruin the factory UV layer! They should really have a big warning about that. Lesson 2: It's all about how you spray. Too much or too little, and it will look cloudy. Lesson 3: Taping is not enough. This will overspray onto your paint if you don't use plastic to cover several feet around. You can remove the overspray with rubbing alcohol, but it isn't easy. Lesson 4: The scrubber will leave a lot of light scratches that are visible under bright light. Lesson 5: After treatment, the headlights look clear straight on, but slightly filmy from the side. Most people won't notice, but it's not as good as new. (but maybe I still haven't perfected my spray technique) The whole story: After my first attempt, the left headlight looked clear from the front, but had a slight film when viewed from the side. The right headlight was another story. It was so filmy, it looked like I'd ruined it. With despair filling my stomach, I called tech support. Kudos to them for instantly answering. They said to do it over again. This time, during the second step, I applied slightly more spray on the first pass. It looked perfect even from the side! But after the second spray, it had that slight film again. I've settled for that. I guess I'll get more chances to practice, since I'll have to do this every year from now on. That's the price of ruining the factory UV protection. :( If I get up the energy, I might try a sanding kit, and applying a thin plastic UV film, which I've now learned is the best and longest lasting solution (5 years of protection). UPDATE: I have now redone the right headlight 4 times, and have yet to achieve a factory clear finish. It remains slightly filmy when viewed from the side. It's acceptable but not perfect. I'm calling it quits. I will be moving on to a sanding based solution.
F**I
Beginner friendly
Good product and easy to use
S**Y
Guiding Light
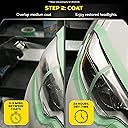
Here's how to perform a successful headlight restoration job if you learn from other people's mistakes: 1st, Find a car wash bay or garage so that you are not in any direct sunlight during this process and very importantly for a successful outcome, you want to be enclosed so that the wind doesn't cause the final step of the job to be ruin, which is to spray the coating onto the headlight for maximum protection. 2nd, Take a before and after picture of your headlights so you can see the wonderful work that Meguiar's Headlight Restoration Kit has contributed to your car. 3rd, make sure the headlight is completely clean(e.g., bugs, debris, dust, etc.) and dry. 4th, outline the headlight with masking tape. 5th, Apply a quarter size solution onto the soft side of the buffing pad in the box. 6th, Rub the solution in a back and forth motion, not a circular motion. Apply a little more if need and remember a little goes along way. 7th, Once it's all rub in; foggy & clear, take a damp microfiber(only) cloth and wipe until the solution is all off. 8th, Then, use another dry microfiber(only) cloth to wipe clear making sure the headlight is free of any residue from the solution. 9th, Spray the headlight coating onto the headlight from left to right, do not spray excessively are the coating spray will run onto the bumper and surrounding parts. Leave on for 3-5 minutes and repeat the process, again after 3-5 minutes. 10th and final step, remove the masking tape and enjoy the newer look of your headlights thanks to the Meguiar's Headlight Restoration Kit(Two StepProcess). I wanted to take this time to edify the company's product because it amazed me by the outcome of the job. Great product, highly recommended!!
L**H
Muy bueno!
Me encanto el resultado !
M**S
No more hazy headlights
I wasn't sure if this was going to work, but it seems to have done the job. Ive included before and after photos of the light that wasn't too bad. The one that was badly hazy received the same treatment but got a medium wet coat of the clear, but it was too much and I'll probably have to redo the treatment once it's had a chance ro cure properly. On the left light seen here I only did a light coat and that seemed to do the job.
M**A
Best product for your car
Excellent product. Don’t think, just buy and use.
M**1
Feels like new headlights
Love this product. Works wonders. My vehicular is oldish and I cleaned my headlights and fog light and they look like new. Very clear. Careful on first use a the cleaning is easy and precise but when spraying the second step be careful it's not windy lol. Or careful not to put anything in the lights until it's dry. OUPS
A**L
Good but…
It’s a good product, but if you’re going to clean the headlights manually with hands only it’s gonna take forever. It would be better to use a 75 mm diameter orbital tool. Make sure the headlight is clean before you spray it or you’ll be spraying it often.
Trustpilot
1 month ago
1 month ago