


Battery + Replacement Kit with Tools Compatible With Apple iPod nano 1st Gen
Product ID: 13074137
📏Compact Dimensions
🔋High Capacity Lithium-Polymer
🛠️2 Non-Abrasive Tools
🔄 Revitalize Your Tunes with Ease!
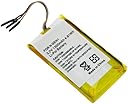
This Battery + Replacement Kit from iGoneMobile is designed specifically for the Apple iPod Nano 1st Gen, featuring a high-capacity lithium-polymer battery, two non-abrasive installation tools, and a comprehensive instruction manual, all in a lightweight and compact package.
| Brand Name | iGoneMobile |
| Item Weight | 0.353 ounces |
| Package Dimensions | 3.9 x 3.5 x 0.3 inches |
| Number of Items | 1 |
K**
Nice replacement battery for 1st Gen. Nano
Before replacing the original battery, after a "full charge", my 3 1/2 year-old 1st gen. iPod nano would only play about two songs, then die. So, it was definitely time to replace the battery. This new battery lasts about 7 - 8 hours. I'm thrilled to have use of the nano back!Note - the tools that the battery comes with may or may not be sufficient to get into the nano. I found it a lot harder to get into the nano than some of the instructional videos on YouTube would indicate. After several unsuccessful attempts, the plastic tools were pretty well worn down, so I had to go with Plan B which included a very sharp knife and two screwdrivers. Once in, I was able to fairly easily de-solder the three old battery wires, and solder in the three new wires. The wires on the replacement battery are just barely long enough to get the job done. And, the three solder points are VERY close together, so use the finest-tipped soldering iron you can. (And be sure to write down the colors of the three wires you removed, so as to correctly connect the new ones.)All of this is just blah blah blah to help someone else replace their battery. As for the product itself, I am very pleased, and it certainly breathes new life into my little audio companion.
R**D
Jeweler-level skills...almost
As a kid, I did a fair amount of car and rocket model building, I had an erector set, a chemistry set, and and electronics set. I did a lot of soldering in my dad's basement. All of that experience was necessary to pull this off. But in the end, it worked out perfectly. The battery even came half charged, so as soon as the case went back together it was instant feedback and gratification. Below is a hyperlink to the detailed directions I used. Look it over and consider whether it is something you want to tackle. I skipped steps 13-17 (complete separation of the logic board from the case). This is a crucial decision, because the separation of the logic board from the case requires the removal of a couple of ribbon cables, and it raises the difficulty even more. Instead, I partly separated the logic board and case by sliding a small screwdriver between them near where the soldering takes place. This assures that the case does not become a heat sink when soldering occurs, and prevents damage to the case. However, eliminating the complete separation of the logic board and case (they remain attached by a the ribbon cables) makes the soldering slightly more challenging. Finally, I suggest that you use the assistance of another person with excellent finger dexterity (and a lot of patience) when it comes to the soldering task. Don't ask him/her to hang around until you get to that phase, or you might lose them. The assistant's task is to hold the case/logic board steady as you tweezer/solder the wires back in place. [...]
B**T
Yes it's easy, just really small.
My wife's Gen 1 nano had one of those bad batteries that did not last, and I should have complained three years ago but I am not all that good a winer. It comes apart just like the Utube videos say, the leads are pretinned so I pulled out the little soldering pen and had at it. Took about 10 minutes because I needed a magnifier to make sure I did not mess up the tiney connections.
M**R
I hate it
to replace this battery requires WAY TOO MUCH work - this is absolutely absurd - I am total disgusted with Apple - there is no reason that I have to rip apart a device just to replace a battery. I just spent $10 for something I cannot use - I have no idea how to replace this.
T**H
Great battery. Works perfectly. Cannot ask for more.
I'd have to give this 5 stars although installation was NOT an easy task. That's Apple's fault though, they want you to go buy a new ipod when the battery dies. My battery started leaking out after about three years, reaching its full charge in less than 10 minutes and runs out of juice after about 3 minutes. I was going to toss it out but thought I've got nothing to lose by trying to replace the battery. After reading a few reviews, I ordered a Weller SP23LK Marksman 25 Watt Soldering Iron Kit too, and they both arrived on the same day. DO NOT ATTEMPT THIS WITHOUT A SOLDERING IRON AND EXTRA SOLDER. Be sure to watch a youtube video iPod Nano 1st Gen Battery Replacement. There are a few out there, I watched the one by by ConsoleZombie.com. The hardest part is disassembling the ipod and closing it back together.
F**0
Almost Perfect
This is a good replacement battery for the first generation iPod nano. The package includes the tools to open the iPod which aren't excellent, but will suffice. If you use them too much the plastic that they're made out of will start to wear down and it'll be a lot harder to open the iPod. Another thing is that a soldering iron is needed to remove the old battery and place in the new one. It would have been nice if the product description said that, but luckily I had one on hand. Otherwise, the battery holds its charge reasonably well.
R**N
disappointed
I was so excited to see the battery so cheap, my husband got ipod opened put in battery but was to big to close it properly. waste of money.
D**.
Great product!
Great item!!! It was easy to install with soldering iron and worked great until Apple recalled the Gen. 1 Nano that required this battery.They sent me a Gen. 6 Nano.
Trustpilot
5 days ago
2 weeks ago