Sobre nosotros
Servicios al cliente
Atención al cliente
Acceso Regional
Legales y políticas
Obtén la aplicación

Apunta tu cámara para descargar la aplicación
Copyright © 2024 Desertcart Holdings Limited


🌟 Elevate Your Comfort Game with Smart Technology!
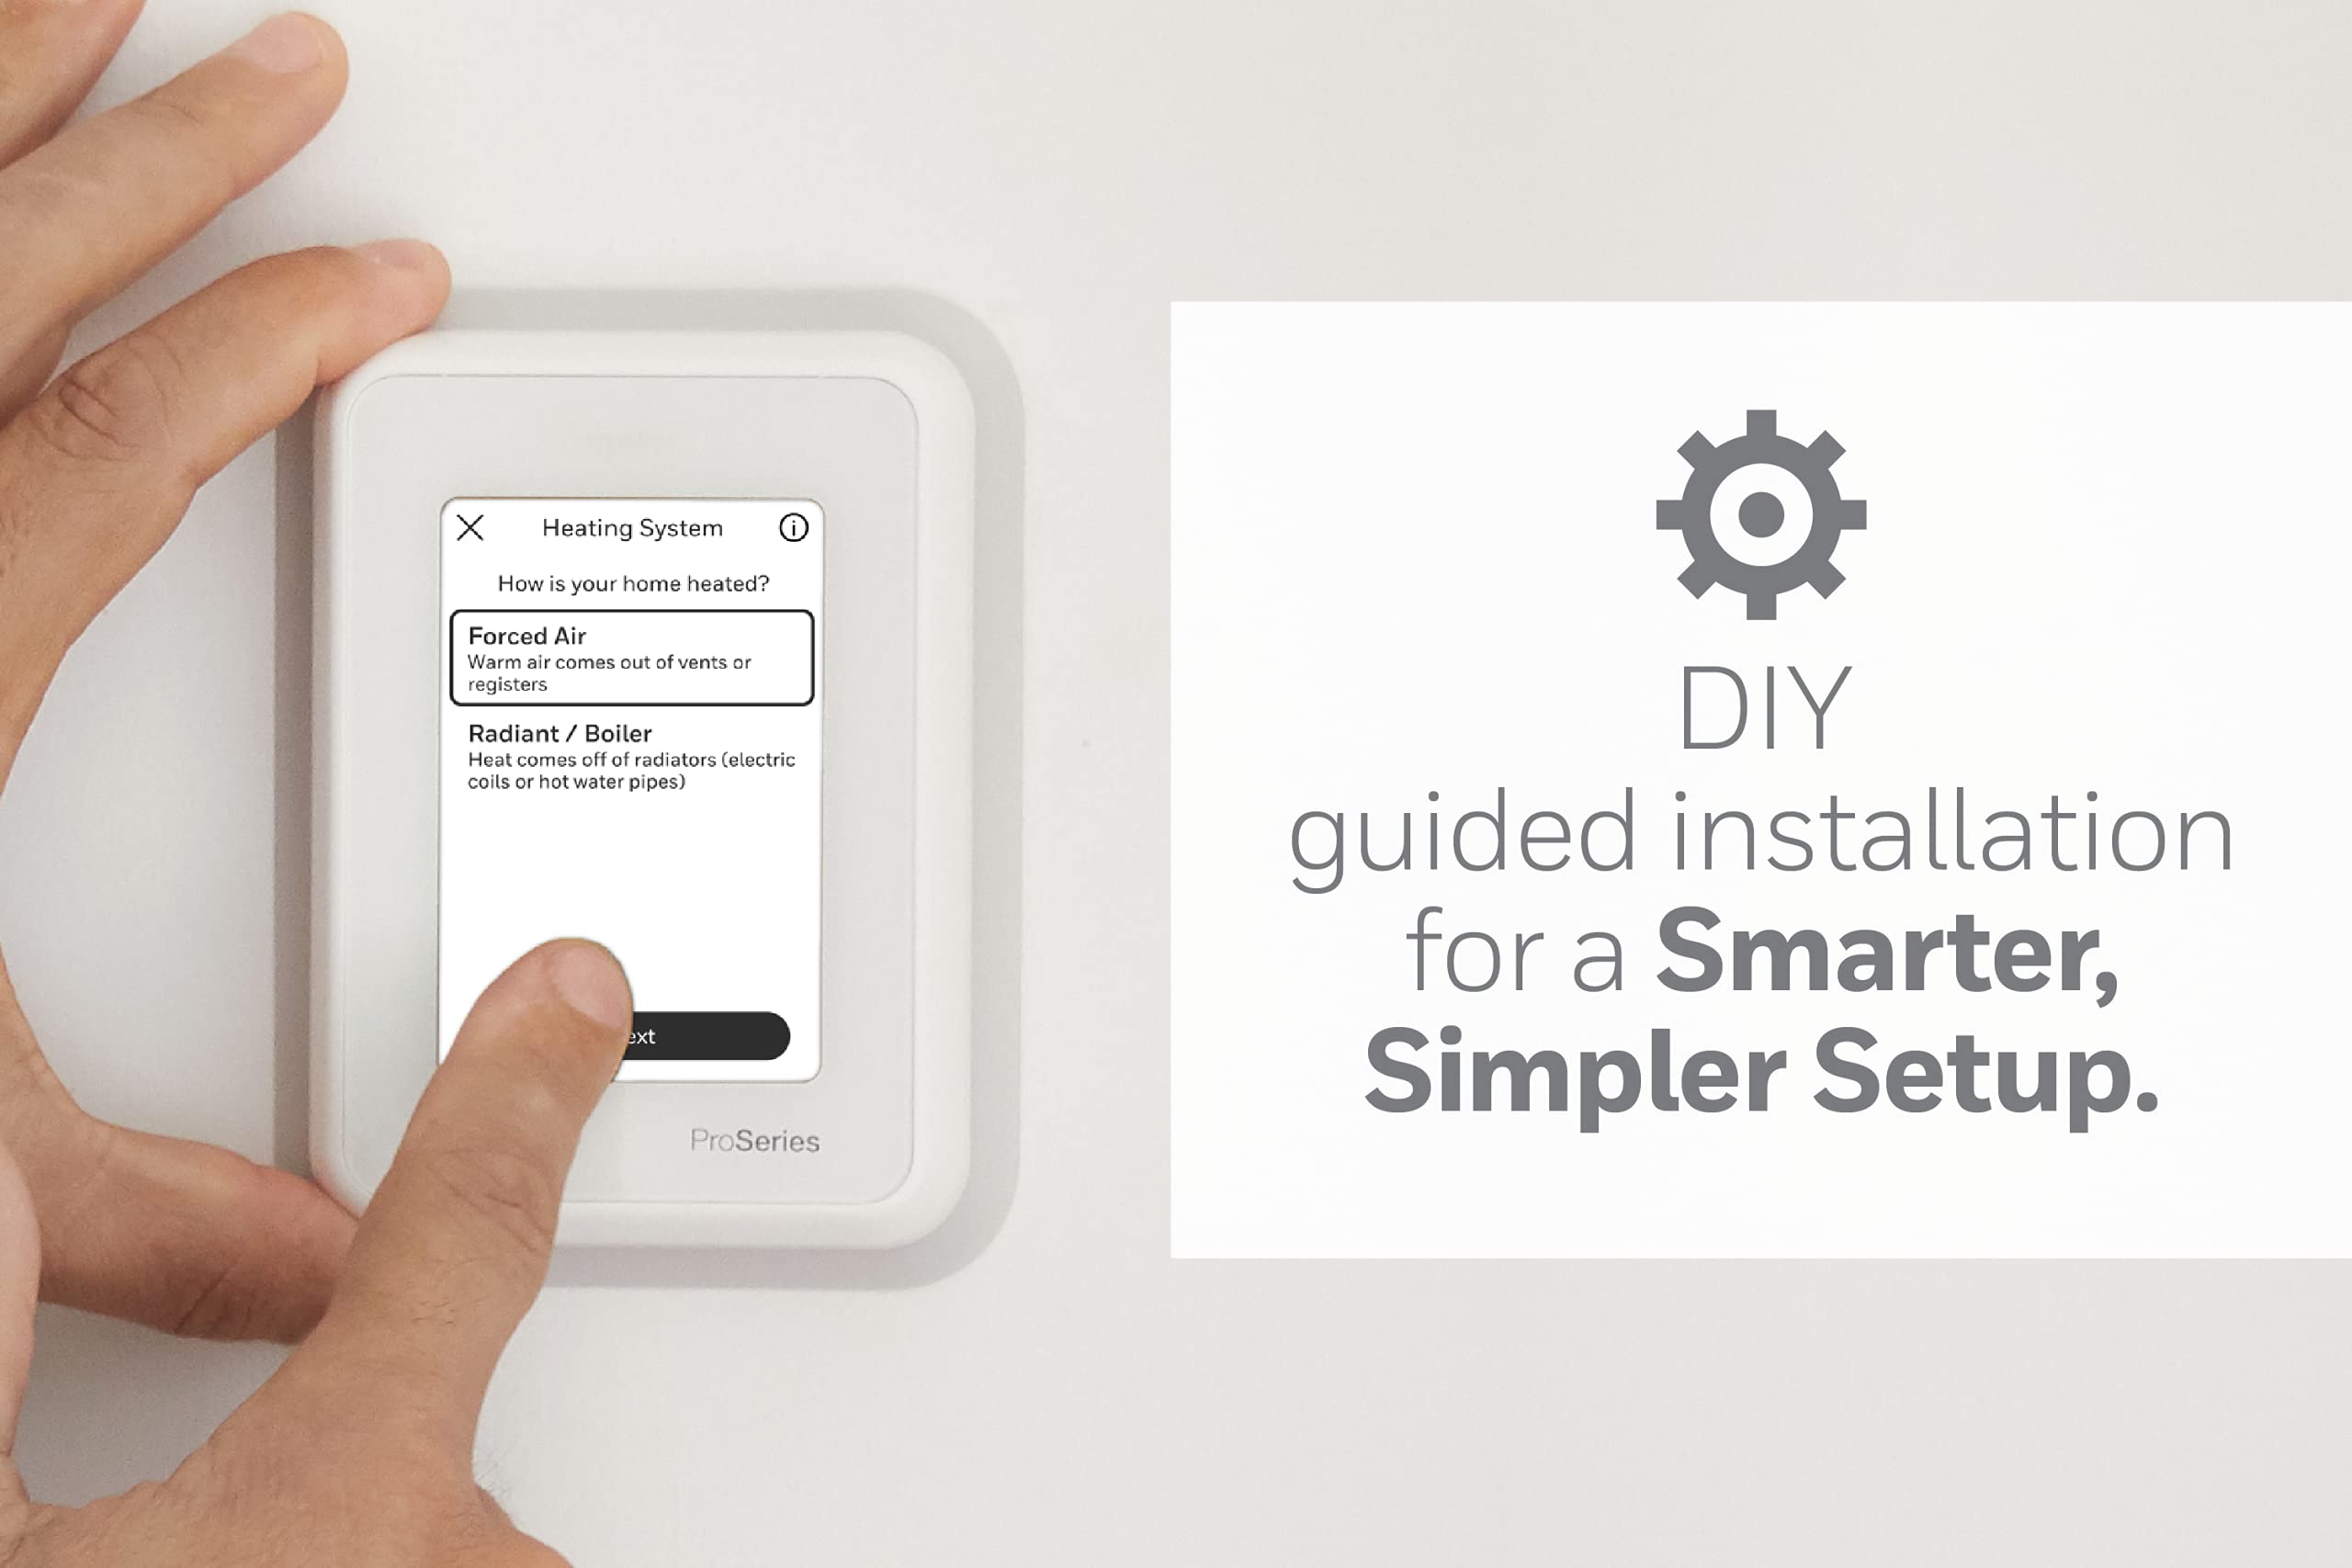
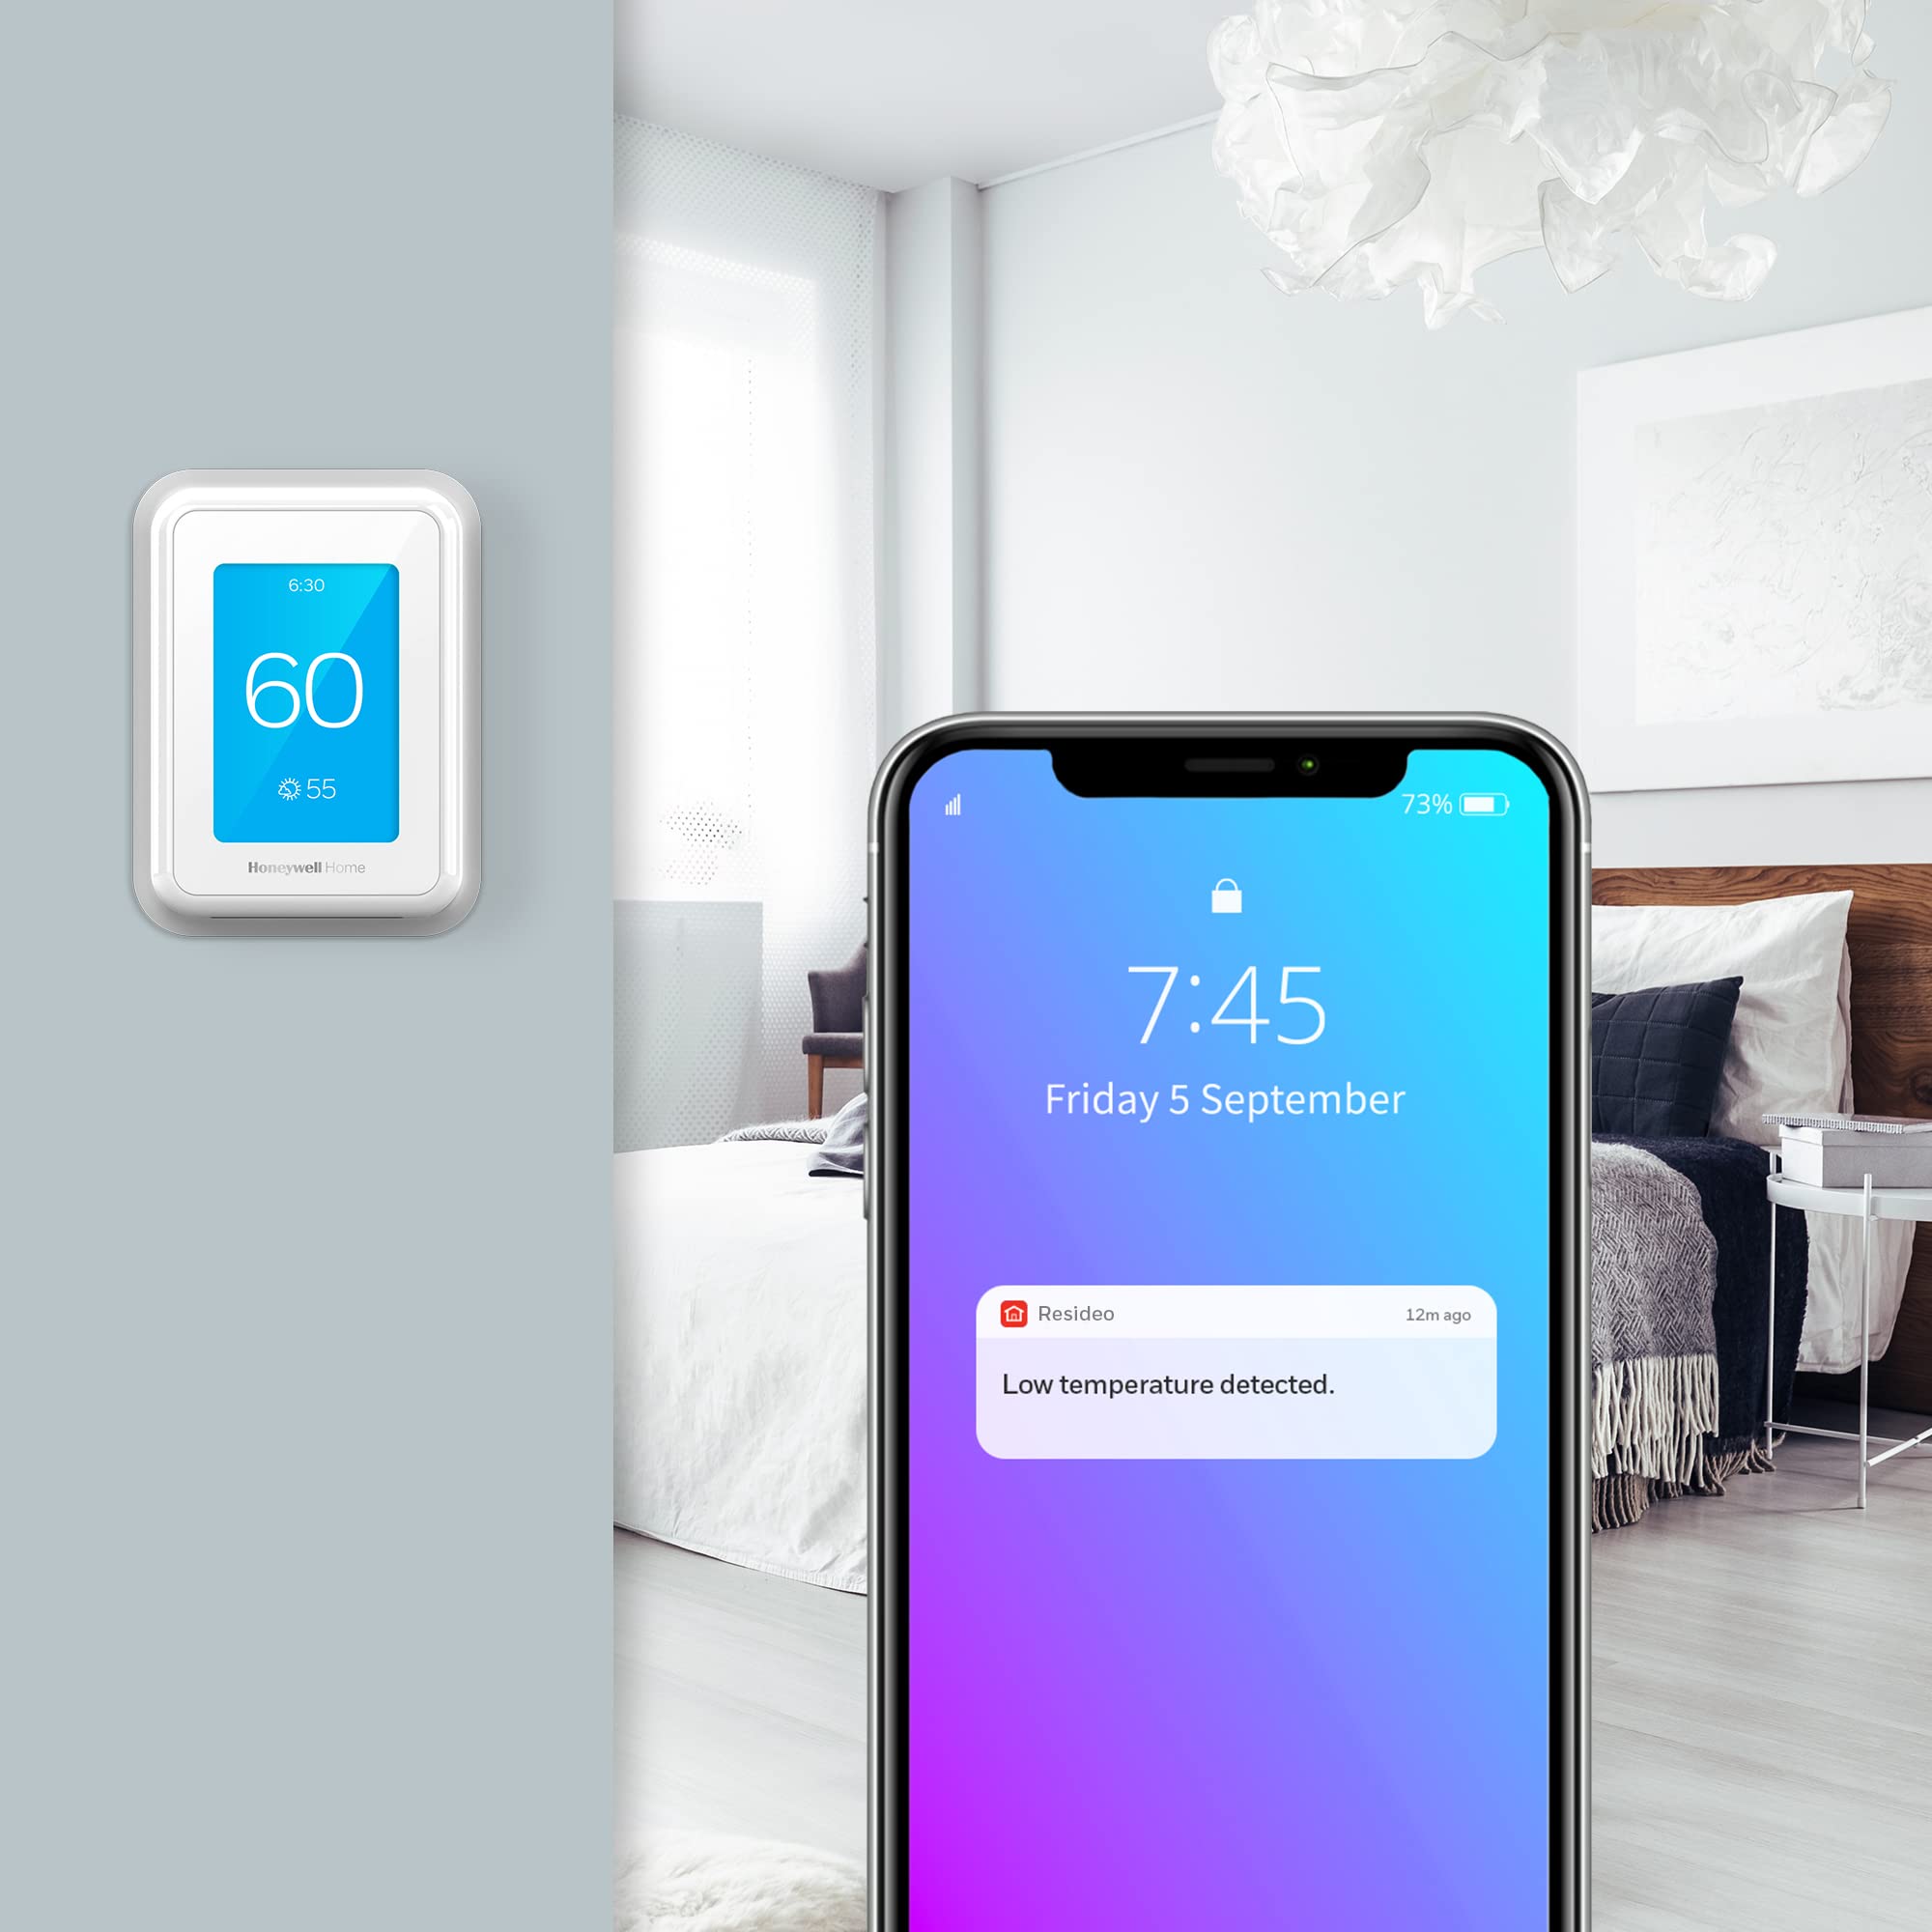
The Honeywell Home T9 WiFi Smart Thermostat is a cutting-edge device designed for modern living. It features a user-friendly touchscreen display, compatibility with Alexa and Google Assistant, and includes a Smart Room Sensor to ensure optimal comfort throughout your home. With Wi-Fi connectivity, you can control your thermostat from anywhere, making it a perfect addition for tech-savvy homeowners looking to enhance their energy efficiency and lifestyle.
| Brand | Honeywell |
| Controller Type | Amazon Alexa |
| Colour | white |
| Connectivity Technology | Wi-Fi |
| Power Source | Battery Powered |
| Voltage | 240 Volts |
| Control Type | Button Control |
| Control Method | Touch |
| Connectivity Protocol | Wi-Fi |
| Mounting Type | Wall Mount |
| Style | modern |
| Backlight | Yes |
| Number of Batteries | 2 AAA batteries required. (included) |
| UPC | 085267723534 |
| Global Trade Identification Number | 00085267723534 |
| Item model number | RCHT9610WFSW2003 T9 |
| ASIN | B07N849J21 |
A**R
Compatible avec HILO (Québec, Canada)
Ce thermostat est recommandé par HILO pour contrôler le système de chauffage central (avec thermopompe)
H**O
Excelentes
Funcionan super bien y su material es de muy buena calidad
D**Z
Super easy install, works great!
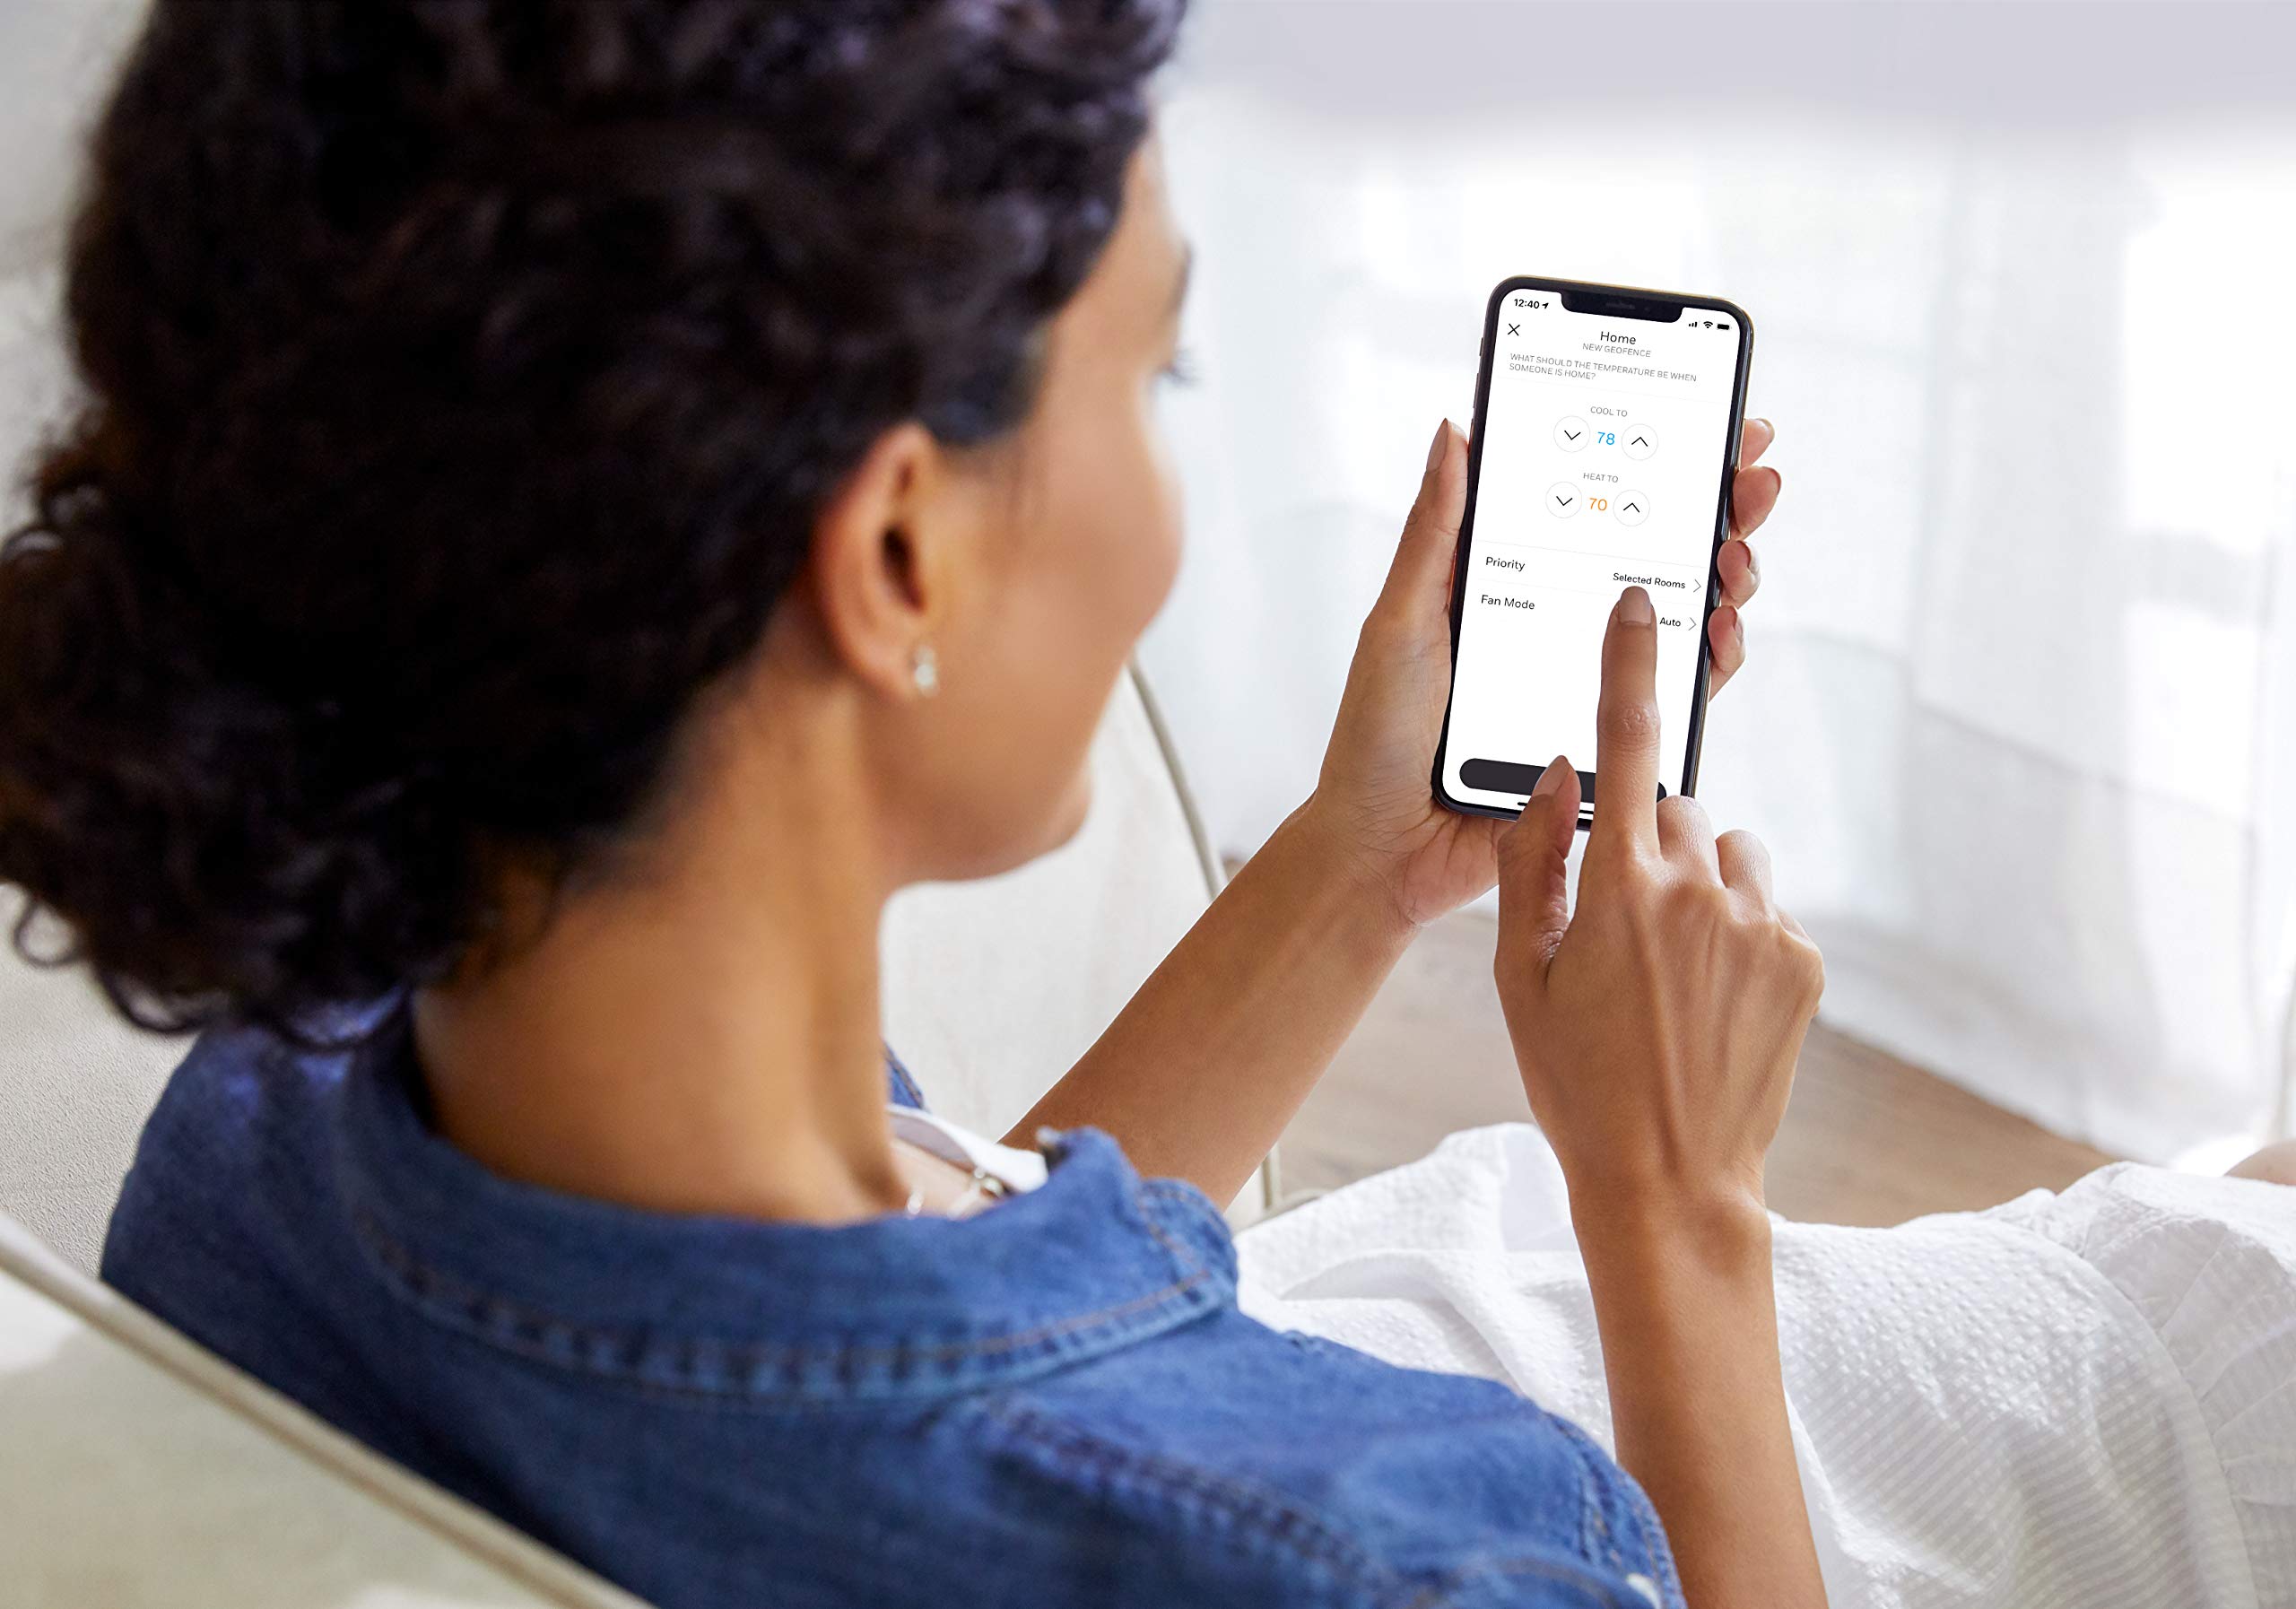
(this review is long but detailed - hope it helps someone)I hesitate to review this thermostat too soon, as I bought a Honeywell RTH9585WF1004 ($200) 14 months ago, gave it a good review, then 13 months later it completely lost any accuracy of the actual temperature - and why I now have the T9. I also hesitated to continue with Honeywell, as the past 2 wi-fi thermostats from Honeywell were horrible (TH9320WF, returned within one month, and the RTH9585, worked for 13 months) - but I didn't like the other brands available. The T9 is brand new, and the remote sensors sounded awesome for my house - 2 story, 1 AC unit, terrible air circulation, temp varies between floors/rooms.INSTALL: I removed the inaccurate Honeywell RTH9585, and installed the T9 according to the very basic install instructions. I had one issue with installation which was my own fault - set the wrong type of HVAC unit in Setup, so the AC wouldn't turn on - then I caught my mistake. I'm still not entirely sure I have the correct type selected, as the T9 indicates my heat pump is 2-stage and I don't believe it is...I'll find out in Nov when I need heat in Arizona.SMART ROOM SENSORS: Bought a total of 4 Smart Room Sensors, 2 for upstairs (one in M Bed) and 2 for down. After installing the Base unit, went to Settings and simply followed the unit's displayed procedure for installing/naming the Smart Room Sensors (place one sensor, return to the Base, name it, then go on to the next sensor).SCHEDULING: This section was really easy setting up a "5+2" day schedule which allows for multiple Away/Stay cycles (vs the usual 2 On/Off, On/Off cycles on previous thermostats). It was also really easy choosing which Sensors to use in the programming. Example: WAKE time, I'm in the Loft on the computer, so that's the Sensor that the Temperature is based on. AWAY time is mid afternoon (Peak Pricing) so the temp is set higher. HOME is at evening (when Peak Pricing ends), I'm always downstairs in the Kitchen or Family Room, so the Temperature is based on those 2 Sensors, SLEEP at night the Temperature is based on the Sensor in the M Bed. More cycles can be added - I'm not sure if they can be named differently. I have the sensors set for times, but they can be used as motion detectors to detect Activity, making them active. If multiple sensors (that you selected) detect activity, the temperature is based on the average of the Active sensors. I don't know what happens if a sensor senses brief activity (like grabbing something from the kitchen then leaving that room, example) or what happens once one goes to bed, thus there is NO activity. For me, using set times is better. Geofencing is also an option but not one I need/use. It detects (via your cellphone) when you're in/out of range and adjusts the temp based on that. (how it works with a family, I don't know) I'm honestly not gone for more than several hours at a time, plus I have a zoo so can't let the house get too warm/cold.HONEYWELL HOME APP (Android): After a week using the Schedule I'd set, it needed a bit of tweaking with some temp changes and changes in renaming/moving a Sensor. I had already installed the Honeywell Home App on my phone but hadn't really messed with it - so I did my "tweaking" of the T9 programming through the App, not the Base unit. It was a bit confusing at first (it's not super intuitive) but, once I got the layout of the App, I was able to make temp changes, move a Sensor, rename a Sensor, adjust some minor details. Using the App (once I got the hang of it) was easier to program the T9 than using the Base unit - I was able to do it sitting down in another room vs standing, hunched over at the Base unit. The App can't be used for the Initial Setup of the Base unit, obviously.CONS: 1) Wi-Fi is supposed to be 2.4Gh or 5Gh. I tried to set the Base to my 5Gh signal...it found the signal but would not connect to it - I got an error message and told to contact Honeywell Support. I didn't want to mess with that (I've read it needs a Firmware update - I just haven't checked if that's true) so it's set to the 2.4Gh signal. Honestly, don't know what diff it makes, why would a thermostat need a faster signal? Only reason I can think of is that my phone is set to the 5Gh and the T9 to 2.4Gh - BUT I was still able to reprogram the Base using the App, so I don't know.2) The instruction manual is very basic; it gives very brief install instructions, the pictures of the wiring could be a little bigger/clearer. There are no instructions for installing/setting up the Sensors (the Sensor box has a very brief install/program/pairing instruction). That's all described (fairly well) on the Base units display.3) The Honeywell site has no more instructions than what's in the box. There are some VERY short (~2min) videos on how-to for a few basic things but I didn't watch them. An Online User/Help Forum would be a great addition, I'm sure most people have the same basic questions and some need more detailed instructions - forums are super helpful. It's possible they do have a Forum somewhere but I didn't see one or a link.4) Alexa is supposed to work with the T9...and it does (once you add the Skill through Alexa - make sure to remove the app/skill for older thermostats) but it's rather confusing. The Alexa App did a search for new items and it found the T9 Base, as well as the 4 Sensors. I can use really basic commands BUT you have to use the name you gave to the Base and/or Sensors...I said, "Alexa, raise the temperature 1 degree" and it replied, "I found multiple items...". I haven't explored it enough to know whether I can say, "Raise the temperature of Kitchen 1 degree" or so on for the other Sensors - and again, Honeywell has NO online instructions for using Alexa or other voice apps. On the other hand, for now I have the programming/scheduling JUST right for all rooms and various times of day, so I've not needed to change it since my tweak.5) The price is a bit high. Over $300 for the T9 and 4 Sensors (especially since I spent $200 last year for the previous Honeywell unit). So far, having the house a LOT more comfortable and NOT having to be changing the thermostat setting throughout the day, it seems to be worth the money.6) The sensors are applied using double-sided tape. This is both a pro and a con. Even after cleaning the wall where one sensor was going, the sensor fell off the wall 5' to the tile floor. The tape is nice for not having to use screws and in that I decided to move one of the sensors, but I'd feel better using a screw.PROS: 1) It's only been 2 weeks, but the T9 is working great and it's nice having various rooms of the house at slightly different temps at different times.2) Easy installation. For my HVAC unit (12 yo heat pump) the wiring was simple enough and I already have the C-wire. The T9 does come with an adapter for homes without a C-wire, I don't know how easy it is to use.3) The Setup was actually very easy to use (aside from the 5Gh Wi-Fi not working).4) The Honeywell Home App is also easy to use, once one understands the interface.5) Multiple Home/Away cycles. I'm generally home all day so I don't need more than the usual 2 On/Off, On/Off cycles but I'm sure the additional cycles are convenient for some households.Final thoughts: I've read several other reviews complaining of needed firmware update and a hassle of needing to use 2 Wi-Fi phones to do the update. I couldn't get the 5Gh to function, but the 2.4Gh works just fine. I guess some people have their Wi-Fi set up so there aren't 2 separate signals? I'm not sure - but I might find out someday if I ever decide I really want the 5Gh signal. I've also read people complaining about the App not working. I've had no issue at all with the app. Also, I've seen people state that if the power goes out, the entire T9 configuration and schedule is lost. I haven't had power issues, I just hope that's not the case. One would think that the settings are saved either at Honeywell Cloud or on the phone, if not the unit itself (though it doesn't use batteries). I hated the previous Honeywell Wi-Fi thermostat, but it never lost it's programming so I can't comment. In my experience so far, even though the included instructions were very basic, the setup for the T9 was straightforward and easy to comprehend using the Base unit's displayed instructions. I only hope that I didn't spend $300+ on a Honeywell Thermostat that will only last 13 months, as my last $200 unit did. So far, I love it.
V**A
Works just great
The media could not be loaded. Installation:This thermostat only works with the multi wire setup (red, white, yellow, green) and required power (blue). The package includes a power adapter in case you don't have a blue cable. The manual is very detailed about the installation process, however, it is pretty straightforward.I run into only one thing, that worths mentioning. As the installation was done, I switched the breaker on. This caused my AC unit to start running for a few seconds. After the thermostat booted up, I couldn't turn on the AC. The screen was showing: Waiting for equipment. It turned out, that this is normal, as the AC unit needed a little time (about 2 minutes) to recuperate. After that all worked well.Setup:The thermostat interface is easy to read, and it has a mode, that just goes through all the settings that can be set on the little panel. Wifi, name, etc.If the thermostat is on the sensor connection screen, then the connection is simple. The sensor has a little button that needed to be pressed and then it just connects to the thermostat. The sensor comes with the 3M double sided, easy remove tape, it is simple to attach them to the walls in the rooms. It does make sense to buy more sensors if you have multiple levels in your home.The app on my phone worked right away, I needed to connect with the thermostat using a QR code. The app is not that straightforward, in my opinion, and has some potential for improvement. For example the multiple sensors are down in a screen which is available in some submenu and only the value for which the thermostat is working against shown on the main screen (see prioritized sensor below). There are mainly two modes: automated with schedule, or manual where you can set a setpoint temperature, which overrides the schedule. The manual will eventually revert back to the schedule. Since there are multiple sensors in the system, there are two ways to prioritize the sensors: one is to use explicit priorities for one sensor, the other is to use the sensor's motion detection feature and automatically switch the priority.This latter, however, needs a sensor in that room where the thermostat installed too, since the thermostat itself has (according to the software) no motion sensor. This is a bit of a catch.Setting a schedule is very straightforward: set the desired temperature for the desired time period then select the sensor for the period that has the priority or use the motion detection feature - and done.What I miss, and what I had in the Bryant unit that I replaced, is the humidity control. In the old thermostat I could set that I want to limit the humidity to 45% with the temperature control range of 2F. This meant that even if the temperature was correct, let's say 70F, but the humidity went up to 46% , the AC would turn on, and would work either until the value is back to 45%, or the temperature went down to 68F.Accuracy:I would say the sensors are decently accurate, the thermostat has a fine tuning point where absolute measurement errors can be compensated.Overall impression:I'm actually amazed by this controller. I have a finished basement, a main flooor with living room, and the bedrooms. It was always a pain to get the right temperature in the three levels. This one does the job. Not completely sure how, but this things works.
P**E
C Wire
The install went as directed phone program was a guessing job but ok
Trustpilot
Hace 3 semanas
Hace 1 día