We remain fully operational. Our teams are working around the clock to ensure your deliveries continue safely.

Descargar la aplicación


Servicios al cliente
Sobre nosotros
Copyright © 2025 Desertcart Holdings Limited
Descargar la aplicación


Buy anything from 5,000+ international stores. One checkout price. No surprise fees. Join 2M+ shoppers on Desertcart.
Desertcart purchases this item on your behalf and handles shipping, customs, and support to Peru.
✨ Brighten your drive, protect your pride! 🚗
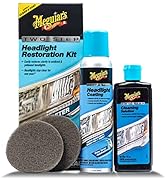
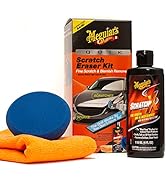
Meguiar's Two Step Car Headlight Restoration Kit offers a professional-grade, easy-to-use solution to remove oxidation and yellowing from plastic headlights without drills or sanding. This kit includes cleaning and coating solutions plus abrasive pads, restoring clarity and providing up to 12 months of protection against re-oxidation. Ideal for DIY enthusiasts seeking improved nighttime visibility and a refreshed vehicle appearance, all backed by Meguiar’s 125 years of trusted automotive care.


| ASIN | B01M75GUJB |
| Best Sellers Rank | #3,191 in Automotive ( See Top 100 in Automotive ) #22 in Automotive Headlight Restoration Kits |
| Brand Name | Meguiar's |
| Contains Liquid Contents? | No |
| Customer Reviews | 4.4 4.4 out of 5 stars (11,444) |
| Global Trade Identification Number | 00070382012632 |
| Included Components | Meguiar's G2970 Meguiar's Two Step Headlight Restoration Kit, 4 fl. oz, 1 Pack |
| Item Form | Wipe |
| Item Type Name | Meguiar's - G2970 |
| Item Volume | 12.72 Fluid Ounces |
| Item Weight | 0.8 Pounds |
| Manufacturer | Meguiar's |
| Material Features | Fragrance Free |
| Number of Items | 1 |
| Scent | Not specified |
| Special Features | Not_Performance_Used |
| Specific Uses For Product | Head Lights |
| Surface Recommendation | Headlights, uncoated clear plastics |
| UPC | 070382012632 |
| Unit Count | 1.0 Count |
| Warranty Description | Manufacturer Warranty |
A**Y
Great results with this headlight kit
I recently used it to restore my car's headlights and noticed a big improvement in clarity. The protective coating made a real difference, helping prevent future fogging. I applied it while my neighbor was mowing the lawn, and it was quick and easy to do. It saved me a trip to the auto shop and gave my car a fresher look. I’m glad I tried it and can see myself using it again if needed.
N**E
Good kit for headlight cleaning
X just finished giving my headlights a quick refresh before a weekend trip. it worked well and the included coating keeps them clearer longer. i’ve used similar products at work, but this one feels handy and easy to apply. no glare while driving now, which is a plus. 😊 fits right into my routine without any hassle. happy with the results so far!
D**K
Great, but additional product(s) may be needed
This product has three ingredients: 1) Buffing Paste (called "G31704 cleaning solution"), 2) Buffing Pads ("cleaning pads"), 3) Clear Spray ("G17804 headlight coating"). It is intended for moderately dirty headlights. It worked great for me, but I used this product as a finishing phase of the headlight restoration. I think my 10 yrs old headlights qualified for being "moderately dirty". They were moderately yellow and moderately cloudy. I put buffing paste on the pad and scrubbed one of the lenses. The yellowing was gone, but otherwise the lens looked just as cloudy as the lens I did not do. It was apparent that the paste was not aggressive enough. I remembered that I had another Meguiar's product, 501 Ultra-Cut Compound, and decided to give it a try. This was a good idea - I immediately saw an improvement. I went over the lenses a few times, until I could not see any more improvement. Then, I went back to the buffing paste included with this kit. I did not use he buffing pad included in the kit this time: it is small and a better fit for a 3" DA polisher than a palm of one's hand. I just took an old cotton cloth (about 10" x 10"), folded it, applied the paste and a little bit of water, and polished lenses until I could no longer see an improvement. The lenses looked much better at this point, however not crystal clear. I washed off the paste with water and while the lenses were wet, I could see a "preview" of what they would look like after coated with clear spray. I dried the lenses, applied clear spray included in this kit, and results were quite good. With the headlights off, the lenses look new. When headlights are on, you can see some scuffs in plastic. Now, to be fair, there is a Meguiar's kit for severe headlight restoration, and that kit includes sandpaper of various grits. But since I restored my headlights to clarity without sandpaper, I feel that "moderate" kit could be improved by including a small bottle with a more aggressive paste in addition to the paste provided; or, at least, by mentioning this possibility and recommending an additional product in the instructions. But overall it worked out great, and I am thankful to Meguiar's for this kit.
M**E
Helpful headlight cleaning kit
Most of all, I appreciated how easy the cleaning solution was to apply, especially when I needed a quick fix before heading out for a long trip. The misty headlights looked much clearer after using the kit, and the effect lasted for a few weeks, which was a relief. This set is a practical option for those wanting to improve their vehicle's appearance without spending too much. I'm happy I gave it a try.
D**N
Easy way to make my car headlights look new
Engaging with this kit made the cleaning process straightforward. i took my car on a road trip, and these headlights looked sharp after using the product. the cleaning solution and coating work well together to restore the clarity of the plastic and keep it protected from future oxidation. it's handy having everything in one pack to get the job done quickly at home. the headlights look noticeably clearer, which makes a difference for nighttime driving. overall, i’m glad i gave it a try and will keep it in my car kit for regular touch-ups 🚗✨.
J**N
This will remove the factory UV protection. Don't use it unless your headlights really need it!
I naively bought this hoping to polish some light wear out of my otherwise clear headlights (3 year old Audi A5). But ultimately ended up worse off. If your headlights are cloudy, I assume this will greatly improve them. But it's trickier than I expected, and needs more thorough directions (not even their video is detailed enough). Lesson 1: If your headlights are still clear, all this will do is ruin the factory UV layer! They should really have a big warning about that. Lesson 2: It's all about how you spray. Too much or too little, and it will look cloudy. Lesson 3: Taping is not enough. This will overspray onto your paint if you don't use plastic to cover several feet around. You can remove the overspray with rubbing alcohol, but it isn't easy. Lesson 4: The scrubber will leave a lot of light scratches that are visible under bright light. Lesson 5: After treatment, the headlights look clear straight on, but slightly filmy from the side. Most people won't notice, but it's not as good as new. (but maybe I still haven't perfected my spray technique) The whole story: After my first attempt, the left headlight looked clear from the front, but had a slight film when viewed from the side. The right headlight was another story. It was so filmy, it looked like I'd ruined it. With despair filling my stomach, I called tech support. Kudos to them for instantly answering. They said to do it over again. This time, during the second step, I applied slightly more spray on the first pass. It looked perfect even from the side! But after the second spray, it had that slight film again. I've settled for that. I guess I'll get more chances to practice, since I'll have to do this every year from now on. That's the price of ruining the factory UV protection. :( If I get up the energy, I might try a sanding kit, and applying a thin plastic UV film, which I've now learned is the best and longest lasting solution (5 years of protection). UPDATE: I have now redone the right headlight 4 times, and have yet to achieve a factory clear finish. It remains slightly filmy when viewed from the side. It's acceptable but not perfect. I'm calling it quits. I will be moving on to a sanding based solution.
J**N
Great product
Works great I would buy again
S**A
Does a good job on yellowed headlights, however, they don’t do well on heavier oxidative lights.
L**H
Me encanto el resultado !
S**I
Works great, ended up having to redo step one because I used too much of step 2 so it took longer than it should have. However, that was my error, not that of the product. From my experience, when applying the step two coating, fully depress the spray nozzle from about a foot away from the headlights. Apply in rows, overlapping about 50%. Do NOT press the spray nozzle by only a bit and hold it very close, as you'll end up creating an uneven, and unnecessarily thick liquid layer that will affect how it looks in the end. Ended up throwing out the sponges that came with the product after finishing as they got contaminated with the used product and plastic. The grime hardened and I wasn't able to wash it off, this rendering the sponges no longer usable (see AMMO NYC on YouTube for the importance of not using contaminated cloths etc). All in all, with a bit of time, you can easily save yourself $150 on a new set of headlight assemblies. It won't look absolutely perfect, but good enough to the point that your won't notice the defects unless you're scrutinizing your car closely.
M**A
Excellent product. Don’t think, just buy and use.
D**H
Headlights much improved.
Trustpilot
Hace 1 mes
Hace 1 mes