We remain fully operational. Our teams are working around the clock to ensure your deliveries continue safely.

Descargar la aplicación


Servicios al cliente
Sobre nosotros
Copyright © 2025 Desertcart Holdings Limited
Descargar la aplicación

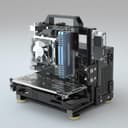


🛠️ Build Bold, Cool Fast, Show Off Loud
The egowz PC Creative Assembly Frame Test Bench is a sleek, open-air aluminum chassis designed for DIY PC builders craving maximum flexibility. It supports a wide range of motherboard sizes (EATX, ATX, M-ATX, ITX), offers excellent heat dissipation with dual water-cooling mounts, and features a modular design that adapts to your custom cooling and GPU layout needs. Perfect for enthusiasts who want a visually striking, high-performance build that invites conversation and envy.


| ASIN | B0CW5LFF5P |
| Antenna Location | DIY |
| Best Sellers Rank | #121 in Computer Cases |
| Brand | egowz |
| Case Type | Mini-Tower |
| Color | Black |
| Compatible Devices | EATX, ATX, M-ATX, ITX motherboards and their compatible components |
| Cooling Method | Water |
| Customer Reviews | 4.5 4.5 out of 5 stars (198) |
| Enclosure Material | Aluminum |
| Hard Disk Form Factor | 3.5 Inches |
| Internal Bays Quantity | 2 |
| Item Dimensions D x W x H | 7.9"D x 9.4"W x 9.4"H |
| Manufacturer | egowz |
| Model Name | PC Creative Assembly Test Bench |
| Number of Fans | 2 |
| Other Special Features of the Product | open-frame design, versatile motherboard compatibility, power supply flexibility, water-cooled heat dissipation support |
| Power Supply Mounting Type | ATX or SFX |
| Supported Motherboard | Micro ATX |
| Total Expansion Slots Quantity | 2 |
| Total USB 2.0 Ports | 2 |
| Total Usb Ports | 2 |
| UPC | 733723195882 |
| Warranty Description | 1 |
J**E
Love this open frame concept - fun build and looks very cool!
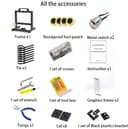
This open frame concept case is actually really cool - been building customer PC's for 20+ years and I really enjoyed assembling the frame and putting the system together in it. I also really like how it looks now that it's all assembled, absolutely a conversation piece and have already been asked if I would build some for other folks. First of all, everything was very well packaged. It took about an hour or so to assemble and it came with everything needed for assembly - even a little partitioned box full of various screws and nuts that slid into the channels, etc. A ruler looking strip of plastic exactly cut to mount the motherboard mounting headers which made that a much easier process than I was expecting. With the design and extra mounting components the re-configuration options of the frame layout are almost unlimited. I am thinking now about a vertical mounting of the GPU from the bottom with a PCIe riser/extension cable. I only have some very minor observations that could be better. I wish the eatx came with one additional (for a total of 3) PCIe mounting brackets. The paper assembly instructions identified the hardware components one way and the online (more detailed) instructions from the QR code identified them a different way so that caused a little confusion - no biggie though. And lastly, I had to modify the plastic U-shaped PSU mounting bracket since my power supply has a switch directly adjacent to the power input (as many do) and covers up the 110/220v switch on the other side of it. Overall, I highly recommend this product to any PC building hobbyists/enthusiasts. It was a very fun build and I think it look cool as heck.
A**S
Super Cool Open Frame Design
Super cool open frame kit. (mATX) I wish they engineered it to be a little more versatile for horizontal/vertical builds but not bad AS/IS. I was able to put it together for a horizontal build that is not its intended use. It takes some time and patience to put together but saves time if you are changing parts in and out. I really dig the look and it fits in a 12" x12"x12" slot in my shelves next to my TV which I game on. All AMD build.
A**R
A Real Honest Non Vine Review
Now, unlike 100% of Amazon Vine reviewers, I will give you an honest review, since this case has been bought with my own money. First, assembly is both time-consuming and tedious, as the instructions aren’t clear in some cases, so you’ll be winging it on some occasions. However, in my opinion, once fully assembled, it’s a gem of your hard work and labor, and you get the benefits of an open-air case for a reasonable price. That is not to say it is free of faults. As previously mentioned, the instructions are sometimes unclear and misspelled. Furthermore, while the kit comes with everything you need to assemble, the parts feel rather cheap, especially the vertical brackets and L joints connecting them together. The screws will loosen and wobble, which could be resolved by better support brackets or even thread locker, but that is somewhat excusable for its price. Now, should you buy this? Well, if you like to be hands-on with your PC cases and have some free time on your hands, then go right ahead. If not, I recommend any other PC case, such as the Cooler Master Qube 500 Flatpack.
H**E
Patience, Key. Excellence.
Patience with asssembly requited. Poor instructions are very bare minimal. I recommend and will be purchasing another of this chassis. It helps to have your own extra hardware and a magnetic dish for keeping everything well organized and manageable while constructing. I used super glue to anchor all joints / everything together at the very end. Overall, excellent. -QFixx.Digital. Peace.
A**E
Good value
Just what I needed for an all-passive build. Not the fastest or most intuitive build, but follow the instructions and it works fine. The only other real competitor for high-powered fanless builds are the Streacom cases, and they’re $$$$. Mesh cases like the AP201 are all right for low power builds but aren’t as suitable for medium power, completely fanless builds as the convection just isn’t there. Note that my build has an air cooled cpu and gpu, the only drives are NVMe on the motherboard, and I’ve made do with only the back panel USB ports for a minimal build. It looks like there are technically provisions for mounting water cooling radiators etc, but that looks a bit janky to me and I think at that point you’re better off with a real case. For my purposes, this has worked great.
M**E
like it a lot
i bought one for my stepson and we built a computer together. This is a completely disassembled case. It will take some time to put together but i does the job. Its not perfect but its good enough. I was so into it i bought a second one and built another computer for my wife. It is a fun case something that isn't standard. I had a party and people were drawn to it.
K**T
Le produit est parfait. Montage un peu long mais ça vaut le coup. Gain de température significatif et beaucoup moins de bruit car pas de boîtier fermé.
R**R
I've built tons of pc's and have worked with them. I will say the assembly took a bit only because of how it goes together but the quality is very good!!! It came screws, screw driver set, allen wrench, all of the parts to assemble it and so on. Very pleased with the quality for the price!!
M**S
Very easy to build and very good looking frame for mini itx. Strong ang good quality, all tools is included in package! 100% recommendation!
D**N
Really good open air chassis. Construction is sturdy and feels high quality.
S**N
Took quite a while to assemble, but having experience with the frame on my ender 3 printer was helpful. Didn't need the video instructions, the assembly photos from their website was sufficient. Everything I needed was included in the kit, and was impressed to find a full cheezy mini screwdriver set as well as all of the small parts in a parts bin. More than happy with the outcome, including a 3D printed top shelf which was super easy to design in tinkercad.
Trustpilot
Hace 3 días
Hace 2 semanas