Sobre nosotros
Servicios al cliente
Atención al cliente
Acceso Regional
Legales y políticas
Obtén la aplicación

Apunta tu cámara para descargar la aplicación
Copyright © 2024 Desertcart Holdings Limited

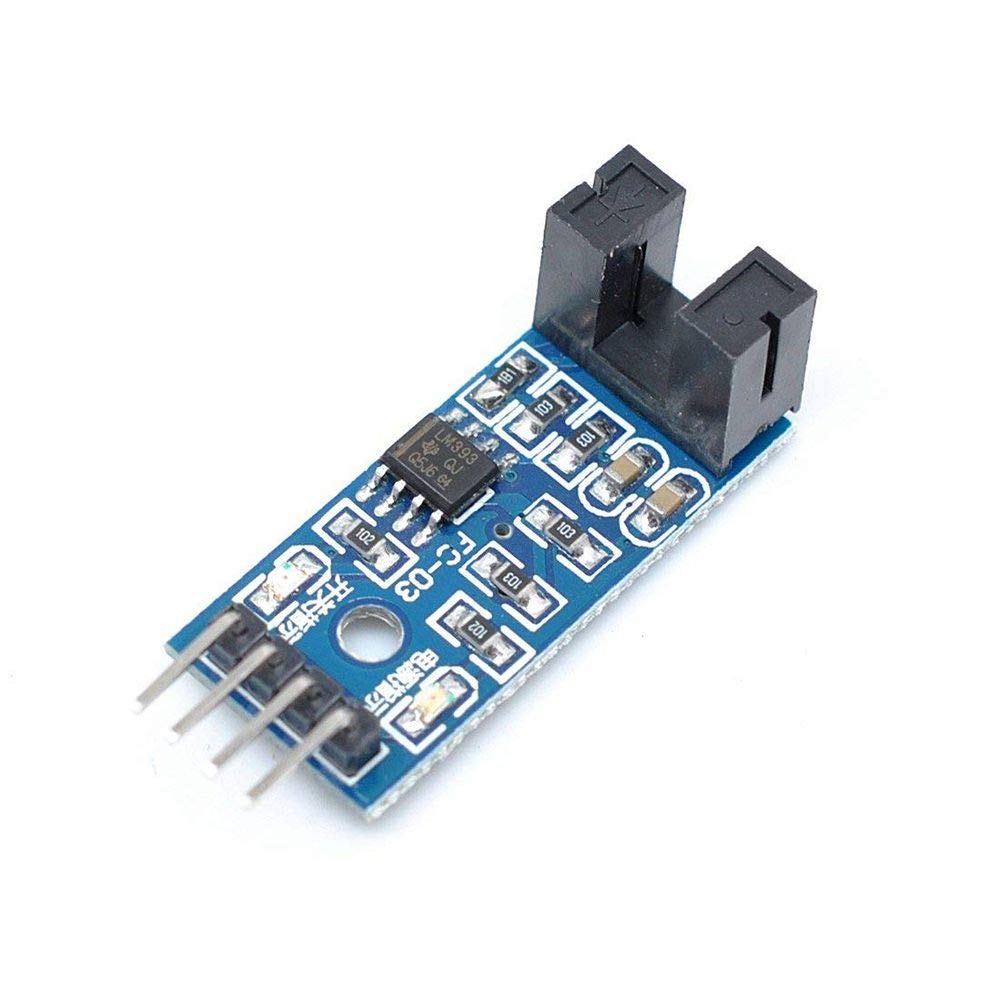


🚀 Elevate Your DIY Game with Precision Speed Measurement!
The 5Pcs Speed Measuring Sensor LM393 is a high-performance tacho sensor module designed for hobbyists and professionals alike. Featuring a 5mm slot width and a robust output capability, this module is perfect for integrating with MCU, RPI, and Arduino projects, ensuring clean signal output and reliable performance.
R**V
Arduino robot encoder
Just what I needed for Arduino robot car encoder
T**I
Product performed as expected without the addition of a feedback resistor
I needed a reliable way of determining the velocity and distance driven of my 6WD robot car chassis and this encoder filled the bill.Two of the six wheels on my robot chassis are not motor driven and have a 6 mm shaft available to attach an encoder wheel. I was able to use a precision ream to enlarge the hole in one of the encoder wheels so it was a press fit on the 6 mm shaft. I then centered the encoder board over the encoder wheel and ran a functional test of encoder output which it passed with flying colors.
C**E
the product arrive in time
the product arrive in time and it fits the description
A**R
good value, as specified
I bought these for some robots in construction. They are fine, well made.I would like some encoder disk options to buy, mainly ones that would fit a 6mm or 8mm shaft.. these are too specific for 1 motor.
L**Y
Suitable for low speeds only in stock form, but fixable...
I attempted to use this on an Ampflow A28 motor and found that I could get clean results at low RPM but testing it at 12V (2500 RPM) got me a flatline -- there was no output on the D0 pin of the board. After reviewing the circuit (+1 star for adding that in the product pics), it quickly became apparent that the design is significantly limited by the 100nF capacitor in parallel with the receiver side of the opto-interrupter. This charges through a 10k resistor and the LM393 won't trip until its + node rises above VCC/2. With an RC time constant of 10k*100nF = 1mS, this takes about 700uS. Since the encoder disk opening is about 50% open/50% closed, this 700uS has to happen in about 1/40 of a rotation (20 holes in the disk), so this limits you to about a 28mS rotation time, or 2100 RPM. And at that speed the output will only be high for a few microseconds (1-2% positive duty cycle)I need to run > 5000 RPM and the simplest solution was to just remove the offending capacitor (needlenose pliers or even a screwdriver will do in a pinch). In my limited testing so far this not only fixed the issue at hand, allowing me to get clean readings to >6k RPM, and also cleaned up the rise/fall waveforms, which originally spent 3-5uS glitching due to the lack of hysteresis on the comparator circuit and the relatively slow voltage crossing due to the large capacitor. I would have designed it upfront with hysteresis, but I'm not going to add anything more unless I find problems down the road.Probing the D0 and A0 pins with an oscilloscope post-mod leads me to believe the intrinsic capacitance of the remaining circuitry will limit this to 10-12k RPM at best -- the duty cycle is already fairly bad at 6800 RPM and the high pulse will shrink as the RPM goes up, but it's good enough for the speed control that I need.3 stars since this is usable.
J**S
Missing and broken pieces.
1 of the 5 sensors was missing, though all 5 encoders were present. Wires sent with product were damaged, with some of the male/female wires missing their male end prongs and some of the plastic ends have come off of the wires. Requesting a refund.
S**F
Connector issues in my application
In order to get the encoder to straddle the encoder wheel in the chassis I am using, I had to situate the encoder with the connect against the plastic case which tilted the encoder substantially. So I have concerns that slots in the encoder wheel and the optical sensor may not be properly aligned. This isn’t necessarily a fault of the product, but more of an issue with my application. To make this better, I would have to unsolder the connector, move it to the opposite side of the printed circuit board and solder it in place again, plus closely trim the lead protrusions.
Trustpilot
Hace 5 días
Hace 1 mes