Sobre nosotros
Servicios al cliente
Atención al cliente
Acceso Regional
Legales y políticas
Obtén la aplicación

Apunta tu cámara para descargar la aplicación
Copyright © 2024 Desertcart Holdings Limited


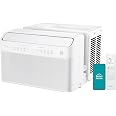
🌟 Chill Out in Style with Midea's Smart AC!
The Midea 8,000 BTU U Shaped Smart Inverter Window Air Conditioner is designed to cool spaces up to 350 sq. ft. with ultra-quiet operation and advanced energy-saving technology. It features smart home compatibility, allowing control via voice commands or a mobile app, and boasts a unique design that permits window opening for fresh air while ensuring safety with an anti-theft mechanism.


| Manufacturer | Midea |
| Part Number | MAW08V1QWT |
| Item Weight | 55.6 pounds |
| Country of Origin | China |
| Item model number | MAW08V1QWT |
| Batteries | 1 Lithium Metal batteries required. (included) |
| Size | 8000 BTU |
| Color | White |
| Style | 8000 BTU |
| Power Source | Corded Electric |
| Voltage | 115 Volts |
| Wattage | 710 watts |
| Installation Method | Window |
| Item Package Quantity | 1 |
| Sound Level | 42 dB |
| Coverage | 350 sq.ft |
| Special Features | Dust Filter, Fast Cooling, Dehumidifier |
| Included Components | Window Bracket, Remote Control |
| Batteries Included? | Yes |
| Batteries Required? | No |
| Battery Cell Type | Lithium Manganese Dioxide |
| Warranty Description | One limited year warranty from original purchase date. (Valid for authorized purchases only) |
| Floor Area | 350 Square Feet |
| Cable Length | 6.23 Inches |
J**.
Quiet, cold, and relatively easy to install
We bought the Midea 8000 BTU unit to replace a portable rolling unit we use in the kitchen/breakfast area during the hot Georgia summers. The biggest complaint about the portable unit was the noise which made conversation difficult. I'll start with the pros and cons and then describe our experience so far.Pros:- Much quieter than the portable unit we had. From about 4 feet away with the compressor on and the fan on high, it's about 65 dB. With the compressor off, and the fan on low, it's about 45 dB. I should have tested the sound level on the portable unit first, but I'd estimate that it's about 80 dB.- The Midea puts out some seriously cold air. My wife said "it's too cold", and turned the temperature up :-) It easily keeps our kitchen cold and would work in a much larger room.- The installation is relatively easy even for one person. I watched a Youtube video two times before starting, and it was straightforward. That said, I did take my time and start to finish including cleanup took me about 3 hours.Cons:- There are small gaps where the bracket attaches on the interior side of the window and also where the unit sits on top of the bracket. Not a big deal, but you have to take extra sealing foam strip and stuff it into the gaps to keep out bugs and a small amount of outdoor air. The gaps are maybe 1/4" at most, but you still want to seal those up.- The unit is small but it still takes up some window area. The saddle style does better in that regard but costs almost twice as much.- The unit might be heavy for some for solo installation. I'm a small but fit guy, and managed it fairly easily using a small table to set it on before sliding it into place.We received the Midea unit in 8 days and did not have any issues with the condition of unit or packaging. All good there.I started the installation at about 8:30 am when it was still cool. The window is 23" inches wide and has a wood frame and a storm window. That wood frame point is important because the installation is different than the vinyl frame installation I watched on Youtube. Vinyl windows have an interior lip that helps hold the bracket in place before the bracket has been screwed in. On a wood frame, there's nothing to hold the bracket from sliding out the open window because of the weight of the outside part of the bracket. In fairness, you can unscrew the interior portion of the bracket from the extern part, but the screws were under some insulating foam so I chose not to do that. I ended up taking a 4" piece of scrap 2x4 and wedging it between the storm window frame and the bracket. That kept it in place while I screwed in the bracket to the side of the window frame. The remainder of the bracket install was easy. I setup up the outside supports so it was slightly lower on the outside for proper drainage. The manual describes it as being 1/4 bubble on a level. Ours is probably slightly more than that with the weight of unit on the bracket. Be aware that storm windows can prevent the unit from leveling properly, specifically, sloped toward the interior which you don't want. We did not experience that issue, so we did not have to add a piece off wood on the interior to raise the height.I thought I was going to need help lifting the unit into position. The description says 55 lbs, but it didn't feel quite that heavy to me. I got a small wooden table that was almost the exact height of the window and put that directly next to the window. I put the unit on the table first which was the heavy lifting part. Once on the table, I could line it up with the window with having to hold the weight of the unit. I then carefully slid the unit into position on the bracket with the table bear most of the load until the unit was fully on the bracket. The brackets and the bottom of unit are a durable painted finish and slid easily once the unit was more a less in place on the bracket. What I thought was going to be the hard part was actually the easiest.The last part of he install was getting all the sealing faom in place. This actually probably took the longest and was simple but tedious. Midea recommends cutting the side foam blocks 1/4" over the measured length. I found that hard to fit into the gap and had to cut it back by 1/8". Also, the wood frame requires a second foam block below the main one, and that has to go around the bracket piece that's screwed into the side of the frame. To get that to work, I had to cut some partil vertical slits in the foam block to fit properly over the bracket. The anti-tip brackets have to slide over the side foam, and that was difficult because the foam was too tall despite being firmly seated on the bottom. I had to press the foam down with either my finger or a screw driver, move the bracket a little bit, then repeat the process several times until the anti-slip bracket was in place. Not a huge deal, but it wasn't as simple as just sliding the anti-slip bracket in place. Last, I looked all around the mounting of the unit and sealed up any tiny gaps with some foam stripping I had around. There were pretty small gaps, but if you have a lot insects like we do here in Georgia, you'll want to seal those up.The whole install took me about 3 hours including cleanup. I wasn't in a hurry, and I took my time to make sure I did everything correctly. I looked at the instructions some, but mostly worked from memory from the Youtube video. As with almost every project there are little idiosyncracies that you have to handle. For example, I bet it took me about 10 minutes just to get the storm window screen out. That was annoying. Having another person might have shortened the install time as well. Overall, I'd say the install was pretty easy after figuring out how to hold the bracket in place to put the initial screws in place. Having two people would have really helped with that part.The unit is definitely quiet and puts out significant cold air. My wife said it was "too cold" and turned the temp up from 70 to 73. It got up to 92 today, and the unit has been cycling on and off (mostly off) while keeping the kitchen nice and cool. The remote has a decent sized display and does what you expect it to. We also connected the unit to the Midea Air app, and again, it does what you expect it to. The app also shows the local weather which is a nice feature.All in all, the Midea is a huge improvement over the portable unit it replaced. It keeps the kitchen cool and does it quietly. It's also a good value based on comparisons we did with other brands and styles. We would definitely buy this a/c again and would recommend it to others with similar applcations.
O**Y
Quiet and Cold!
Initial Review:Assembly & Installation: As a 19yr old 110lb person who has never installed a window AC unit before, installation was relatively easy. Was able to do this by myself while watching YouTube tutorials. Id recommended watching the official installation.Hardest part of installation will probably be cutting the foam and ensuring a good seal is made.Tools I used: Cordless Drill with a 1/8“ drill bit, Phillips bit, Phillips screwdriver, a box knife that can cut high density foam, scissors.Concerns: As others have reviewed, this unit may be prone to growing mold and mildew. To circumvent this, I pitched my unit towards the outside quite a bit while installing to ensure condensation does not flow back inside. I have purchased 3 year insurance just to have the piece of mind in case anything goes wrong. Additionally since this unit does not have any drainage holes, I put a temporary paper towel to wick out the water. I'll probably be looking for a better solution to the pooling water in the pan.Connectivity:Works with Google home and can use voice commands to control the unit 👍. I'm able to set a schedule for the unit to turn on and off when I'm gone or arriving. App works very well and has a lot of options for scheduling.Cooling: It cools, REALLY WELL. I have a PC in my room that acts as a space heater and it gets super hot and humid in Florida weather. This really does make a difference. Almost too cold in the room now!Noise: Super quiet when maintaining temperature. Only noise that slightly bothers me is the slight hum of the compressor and gurgling when the fans splash water onto the coils.Energy Efficiency: uses 90 watts when maintaining temperature at night. Peaks at around 450 watts and gradually falls back down when it needs to reach temperature again.Long Term Review: will update my review for long term use.
E**L
Best bang for your buck!
I've only had it for 2 days but so far I'm impressed. I'm a 34 year old female and I was able to assemble it by myself in about 2 hours. It is heavy and I do recommend having 2 people to at least lift it but it can be done alone, just lift with your legs. It comes with everything you need to assemble it and foam to insulate it and even extra parts for when you inevitably drop one out the window. The written instructions are easy to understand but I do recommend watching the short how-to video just to see it in action. I love that I can still open the window for fresh air when the weather is nice and the unit stays in place. I also like that the main component is outside the window and the dense insulation keeps the outdoor weather and the sound from the machine from coming inside. It has a variety of settings to suit your needs. I've settled on the cool eco setting and it's been perfect! I set the thermostat to the temperature I want using the included remote and it cools the room to that temperature easily. (The room I'm cooling is only 99 square feet but gets a lot of direct afternoon/evening sunlight) From there it works just like a regular AC unit and will turn itself off once the desired temperature is reached and detects when it needs to turn itself back on to keep a steady temperature. It's whisper quiet which is a huge plus! No more rattling and loud fans inside since that whole part is outside the window. I sleep with it on and it keeps my bedroom the perfect temperature without running unnecessarily and it's so quiet that it doesn't wake me up when it does need to turn back on. I'll update this review in the future if anything changes, but so far, I love this unit and it's worth every penny.
Trustpilot
Hace 2 meses
Hace 3 días