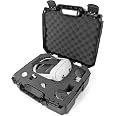
🎮 Protect, Organize, and Carry Your VR World in Style!
The CASEMATIX Hard Case is a robust, travel-friendly carrying solution designed specifically for Meta Quest VR headsets (including Quest 2, 3, and 3S). Featuring a durable hard shell exterior and customizable soft foam interior, it offers tailored protection and organization for your headset, controllers, cables, and accessories. With a reinforced handle for comfortable transport and made in the USA quality, this case ensures your VR gear stays secure and ready wherever you go.
Color | Black |
Item Weight | 3 Pounds |
Item Dimensions L x W x H | 16"L x 13"W x 6"H |
Shell Type | Hybrid |
Material Type | Plastic |
Closure Type | Zipper |
Handle Type | reinforced carrying handle |
Compatible Devices | Gaming Console |
S**W
My CaseMatix experience + a blank grid template + my Oculus Quest 2 template
The media could not be loaded. I'm not really here to review the CaseMatix product itself as much as to offer my experiences and assistance to the community of users / customers. The product seems fine and sturdy and will serve its job well. Seems a little high priced to me, but also seems pretty good quality and should do its job well if you cut the foam properly. That was my first surprise (and not immediately obvious to me) that you have to design it yourself for whatever your use. That's a good thing, because you can use it for a lot of purposes and use it the way you see fit. But it's also more work to have to try to decide the best configuration. It gave me pause, because most of the ad photos show the product finished after someone has cut out the squares.NOTE: I'll try to attach media to this post in the order mentioned in the post. No promises, though! :-)MY LAYOUT DESIGN AND TEMPLATE FOR THE OCULUS QUEST 2 (default head strap)So I looked at the photos that other customers submitted for the way they designed the foam for the Oculus equipment (thanks for those submissions, everyone!). Then I embarked on designing my own.I tried to design mine with extra cushion (2 squares) towards what would be the bottom of the case when it is closed and standing upright. I also didn't want any of the main pieces touching each other and clanking together, and at least 2 squares between almost all of the pieces. I also wanted the pieces to be snug, so they just fit in there and hold in place well. The heavy end of the headpiece is towards the bottom of the case so that when the case is closed and upright, it will not exert extra pressure on headband / earpieces / any other pieces. As you can see, there is also a special section of loose foam (green section in my grid template) to attempt to protect the lenses and keep the headband tamed. The headband excess is folded back and forth gently in its designed foam pocket, leaving extra room for other features in the case. Finally, with some remaining space near the handle of the case, I'm using 2 squares the length of the case for chargers, cords, etc.I found that the foam squares in my CaseMatix case are 28 across by 21 down. Since I had to go through the design work for myself, anyway, I was inspired to freely offer the blueprint for this design here so that others could use it if they felt it would meet their needs and did not want to take the time to design their own (see photos to make this determination if you are interested). To do that, I obtained a grid and colored it in accordingly (see photos). I also included a blank grid (see photos) in case anyone else wants to document their particular design for others to use similarly. I hope this is helpful to someone! :-)TIP FOR SEEING FOAM SQUARE EDGESI also found that it was difficult to keep track of where the edges of the squares were in normal light (for grid transfer, counting squares, precision separating, etc). (Maybe this is my eyes? or maybe I'm not using enough light?). So I offer this tip you can kind of see the square edges when light is above or around you (see photos), but you can really easily see the square edges when you lay a light source (like flashlight) down on the foam and shine it across the surface of the foam (see photos)!SEPARATING THE SQUARESI initially missed the small, single-sided "foam customization guide" included the the case because of the advertisey-looking "follow us" message on the opposite side. So I made the mistake of trying to cut my first section out with a knife. That is not necessary, though, as the squares are connected to each other in such a way that you can pull them apart with your fingers. Once you pull them apart, they are permanently separated, unless you tried to glue them back in or order a new foam replacement. If you pull them apart, there seems to be much less (maybe even none) loose foam fragments than if you try to cut them out. After I discovered the "foam customization guide", it says you can "press down firmly on the blocks of foam you wish to remove and they will separate from the surrounding blocks" however, when I tried this, I was concerned that this method might weaken the connection of the surrounding blocks I wanted to keep in place. So instead I found that separating each block connection one at a time was better. I'm going to try to submit a movie demonstrating this technique (see attached movie). It allowed me to precisely sever only the connections that I wanted to without compromising surrounding connections: You insert your finger on the connection you want to sever (in between two squares), and alternate (wiggle) the tip of your finger back and forth against the two foam blocks you are trying to separate as you press your finger all the way down to the bottom of the blocks.OTHER IDEAS:I am experimenting (see photos) with storing (and attempting to protect) the long and expensive Oculus Link cable under the main foam, so that I can bring it with me and not have to pack it separately and hopefully not have to worry about it getting any kinks / sharp bends in it.I also experimented (not pictured here) with trying to fit my dedicated wireless router in the package (but mine is a little too tall with antennas that cannot be removed), and the chargers and a Chromecast device. The router was really the only thing that didn't fit because it was too tall. So the good news is that there's additional room you can experiment with in this design.Finally, I had another, generic idea to share about the CaseMatix case: This might be especially helpful if you only use it for transporting? You could purchase more foam inserts, and switch them out, depending on what you want to store / transport in it. I haven't checked how much the new foam inserts cost, though, to know if it is very cost effective or not. Information about this is available on the insert called "foam customization guide" (at the CaseMatix website, apparently).Dont forget to register at their website for your free lifetime warranty! (as mentioned on the "advertisey-looking 'follow us' message" insert).
D**T
An Organizational/Protective MUST HAVE.
I went out on limb and purchased this to protect my Super Nintendo. The fact that you can fully customize this means it will protect anything you put in there. I believe the removable sections are 1/2" squares, so it's easiest to place what you want to keep in there and trace the silhouette with a marker and remove the appropriate squares. Its fully customizable layout makes it convenient to store the unit, patch cords, and both paddles. It works great and is a very clean option to prevent dust and damage to your item. This was a great cost-effective way to protect my childhood gaming console. it's holds everything I need to play the SNES and will hold the items in place with protective barrier. I loved it so much, that I bought ANOTHER one just so my N64 now has a home, not just collecting dust on a shelf!In Sum: Great modular storage system for anything you want protected. 10/10!!!
W**R
Great case! Accommodates my Quest 3 with mods and accessories.
Easy to customize for your individual needs. Just be sure you've measured and laid everything out to be sure it will all fit.I've included 2 pics... One with my cuts and one with the case populated.I have the KIWI design K4 Boost Comfort Battery Head Strap and the AMVR Facial Interface. It all fits nicely. I did cut out a small section of the bottom padding of the case to accommodate the head strap so there wasn't too much pressure on the strap when closing the case.
A**R
Tight fit with BoboVR M3 Pro Headstrap, extremely customizable
With the BoboVR S3 Pro headstrap installed on my Quest 3 headset, the case presents some difficulty when closing; however, I was able to accommodate all of my accessories without issue. To BoboVR S3 Pro owners; I recommend folding the back headrest as far forward as you can to save as much space as possible. I noticed in most customer reviews that the headset wasn't center, which can lead to an imbalance within the case; I wanted to share my personal storage arrangement which presents the headset and controllers fashionably and still accommodating to my accessories. This positioning of headset, controllers, and accessories provides optimal protection for all of its components. Overall, I am satisfied with its ease of customizability, and as long as I am personally handling the case, the snug fit isn't a concern during travel. While larger options are available, I prefer this case for its portability.
J**S
Fits my Quest 3 with the KIWI strap
I thought it came already customized for the quest, but I'm actually kind of glad it didn't. I was able to customize it to how I wanted. I was nervous at first that I would mess it up, but I didn't, and ultimately I could have glued pieces back together even if I did.I still have space to add cables and other accessories even after my headset and controllers.The KIWI headset back pad is a bit tall so I have to push it down a bit to close it, but it doesn't damage it.
H**N
Happy camper
What I liked most was you didn’t ask me this question the same day I received it like Amazon always does🤷♀️so. I had a chance to actually use it and I am extremely happy with it.Thank you!!
D**Y
JUST WHAT WE WANTED
Just what we wanted!!!!
E**E
Needs to be deeper on top.
I couldn’t decide to give it a 2 or 3 star review, honestly tempted to return it. First and foremost it does not like third party headstraps. The BoboVr headstrap does not fit in this case and I have to force it close the last like 4 inches leaving the foam on my facial interface and headstrap flat. If you use any fabric one like the official quest ones I’d say you are fine. Another issue is the volume buttons and IPD dial usually gets pressed on hard and I often have my IPD or volume changed. If the top was as deep as the bottom it would be fine honestly. However as it stands it needs the top lid to be as deep as the bottom of the case, or at least a bit deeper.
Trustpilot
Hace 2 semanas
Hace 1 mes