We remain fully operational. Our teams are working around the clock to ensure your deliveries continue safely.

Descargar la aplicación


Servicios al cliente
Sobre nosotros
Copyright © 2025 Desertcart Holdings Limited
Descargar la aplicación

🔌 Power Up Your Control Game!
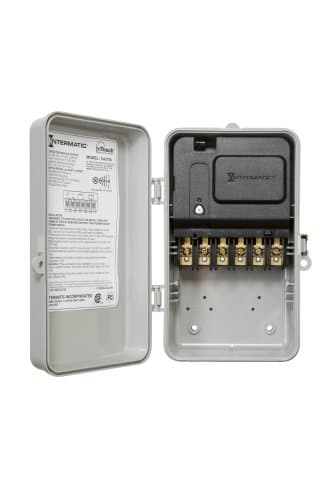
The Intermatic CA3750 InTouch Wireless Multi-Volt Contactor Module offers versatile control for various voltage systems, allowing for seamless operation across multiple locations without the need for a central control system. With its user-friendly design and customizable outputs, this module is perfect for modern electrical management.
| Manufacturer | Intermatic |
| Part Number | CA3750 |
| Item Weight | 2.6 pounds |
| Package Dimensions | 10.2 x 6.8 x 4.2 inches |
| Item model number | CA3750 |
| Is Discontinued By Manufacturer | No |
| Item Package Quantity | 1 |
| Batteries Included? | No |
| Batteries Required? | No |
C**S
It works quite well (if you can make sense of the instructions)
Let me get this out of the way up front: The instructions suck. There, I said it. None come in the box and what you can eventually dig up online isn't too helpful. However, between the electrician looking over the relay itself, and both of us trying to make sense of the diagrams, we managed to make it work.There are 6 posts on the relay box, numbered 1-6.1+2: power for the relay itself3: line #1 (input; always hot, passes through the relay to 4)4: load #1 (switched output from #3)5: line #2 (input; always hot, passes through the relay to 6)6: load #2 (switched output from #5)To connect this to a water heater there would be 4 wires: 2 line (from the circuit breaker), and 2 load (to the water heater). One line wire goes to 3, the other goes to 5; doesn't matter which is which. For the load wires, one goes to 4 and the other goes to 6. Again, doesn't matter which is which.Almost done, but one key piece is missing: power for the relay itself. Without it, the light won't come on, you can't pair it, and the relay won't switch on and off. In other words, it looks like it is broken. So how do you power it? This is where the less-then-helpful instructions could be much better.For a water heater, you just need two wire jumpers. Connect #1 to #3 and connect #2 to #5. That's it.So, to sum up, for a water heater (240V circuit):1: jumper to 32: jumper to 53: line #1 (from circuit breaker)4: load #1 (to water heater)5: line #2 (from circuit breaker)6: load #2 (to water heater)When you discover it with Vera it will appear as three devices. Something akin to relay, relay 1, and relay 2 (I renamed them already so I'm going from memory). The first relay is the main device. You adjust the settings and such there. Toggling the main relay off or on will automatically toggle both relays 1 & 2 simultaneously. When using it in 240V mode, like for a water heater, you should really only use the primary relay. If you were using the relay in 120V mode, relay 1 would handle line/load #1 (posts 3-4), relay 2 would handle line/load #2 (posts 5-6), and the master relay would switch both relay 1 and 2 simultaneously.There is a jumper on the back to switch between different operating voltage modes. It came in 240V mode so the two relays are switched together as if they were a single relay. Verify the jumper is where you want it to be before you start cabling things together.Don't let the poor instructions scare you off. If you are thinking about getting this, go for it. It isn't too difficult to deal with, but if you have any concerns or questions get an electrician. Between the little bit of information in the box, the not-very-helpful diagrams, and the information I provided, a competent electrician should be able to make sense of what is going on in the unit and how it should be installed in your environment.Oh, and for the instructions go to either HomeSeer or Smart Home USA and look for "CA3750".store.homeseer.com/store/Intermatic-CA3750-Z-Wave-Contactor-Module-P407.aspx[...]Update June 12, 2014:I have had this for a year now and it is still working perfectly. There is one minor issue to be aware of though. If the power to the relay goes out, say due to a power disturbance or because you turned off the circuit breaker, the relay connection between line and load is disconnected. In other words, the relay turns off when the power turns off. I only realized this after taking a few unexpectedly cold showers in about a 7-10 day period.It is very easy to work around though. Simply set up a scene that turns on the relay, then schedule the scene to run at a set time every day. In my case, I set it up to trigger every day at 4am.I had originally set up a scene to simply turn the water heater off before peak power rates started and turned it back on after off-peak rates started, Monday-Friday. That worked fine for the most part, although I did have one or two lukewarm showers that I didn't realize was due to this at the time. Unfortunately Vera & my zWave network freaked out during the winter and I had to rebuild everything from scratch. Since I wasn't sure what caused things to break I was only doing the bare minimum to get everything operational again in case I had to start over. Winter is a single power rate all the time so I didn't need to worry about ensuring the water heater was off for the peak rate time period, so I didn't set up any scenes or schedules for it. By the time I was sure everything was stable I had forgotten that there was no scene / schedule to turn the water heater on anymore. It took multiple cool showers before I realized the relay's behavior and that I was missing the turn-on scene and schedule. Since I created the turn-on scene and scheduled it to run daily at 4am I haven't had another unexpected cold shower.So, if you use this on a water heater, and you are not fond of an unexpectedly cold bath or shower, please be sure you set up a scene to turn it on and schedule it to trigger at least once a day.Update Feb 20, 2017:Little overdue update. Back in July 2016 I found out that the switch wasn't working properly anymore. It would turn on & off from the button, but it would only shut off over ZWave; couldn't turn it on anymore. Trying to remove and rediscover into the ZWave network was also wonky: it would only work when going from off to on instead of with every button press.Initially I thought there was a problem with the signal so I followed what someone else did and rerouted the antenna so it poked out of the enclosure. While I did succeed in rerouting the antenna, unfortunately it didn't do anything to resolve the problems I was having. Going through that exercise though gave me the (questionable) idea to take it apart to see if anything looked amiss.Turns out one (or more) of the capacitors went bad. You could tell because the circuit board had goop surrounding a couple of them. I hoped that simply replacing the capacitor(s) would fix the problem, but I didn't know. The suspect capacitors were fairly accessible so I had the (questionable) idea to try to replace them myself, even though I've never really soldered (or desoldered) before. I figured that since it was already malfunctioning there wasn't really any concern about breaking it further.NOTE: I am not, in any way, recommending you do this yourself. If you aren't skilled in soldering, don't do this yourself. Take it to someone that does electronics repair and let them work on it.The capacitors are radial 470 µF, 25 V. I got a few different ones since I wasn't sure how good any of them were nor what the exact footprint size was. PANASONIC EEU-FR1E471LB CAPACITOR ALUM ELEC, 470UF, 25V, 20%, RADIAL (5 pieces) Uxcell a14070900ux0101 30 Piece 470uF 25V 105C Radial Electrolytic Capacitors, Black, 8 x 15 mm Nichicon Aluminum Electrolytic Capacitors - Leaded 25volts 470uF 10x16 20% 5LS (5 pieces) I believe the Uxcell ones were an exact match; I remember thinking "Of course, the least expensive ones". The Panasonic was much too large to use unless I wanted the capacitor to stand about 1/2" away from the circuit board. The Nichicon was also too large, but much closer to the proper size. The leads on the Nichicon could be bent enough to get the capacitor in place within about 1/8" of the circuit board; those are the ones I used.I replaced three of the capacitors. Out of those, I think only one was actually bad. When I tested them with the multimeter one was clearly bad, the other ones looked a little odd. Since I hadn't dealt with testing capacitors before I wasn't sure if what looked odd was normal or not. To be safe, since I was already committed to doing one I went ahead and did the others as well. When I tested them afterward they showed the same odd test results, so I learned that testing a capacitor while in place on the circuit board will skew the test results. While replacing those may not have been absolutely necessary, I looked at it as a preventative measure.There were other capacitors, but since only those three looked suspicious I figured I should put it back together and test it before I went any further. After reassembling it, a quick test showed that it was working properly again. Yay!It's been 7 months now and it's still working perfectly. Plus, since I rerouted the antenna at the same time I also haven't had any reception problems anymore. Yay!While working on it I also realized that the voltage jumper is there to determine what type of power is being used to power the unit, not to change the operating mode. There's a second switch that changes the operating mode from DPST to SPST.I also found that this switch was apparently discontinued some time last year (pre-July 2016). Unfortunately I didn't find anything comparable last year when I was looking for a replacement. I just took a quick look here and found GE Z-Wave Smart Switch for Large Appliances, 40 Amp, Direct-Wire, Indoor/Outdoor, 12726 , so it looks like there is an alternative now.Update July 14, 2019:It's still working and hasn't had any problems since the capacitor (and antenna) surgery I did a few years ago.
J**R
Defective On Arrival, Replacement Arrived Promptly
Don’t waste your money on the CA3750. I just spent 2.5hrs of my life which i will never get back, trying to figure out the wiring due to lack of proper instructions. After searching over an hour online I found some suitable wiring instructions.I then spent the remainder of the time trying to pair it to my zwave network only to find out that it will not pair with my zwave network. I am so frustrated right now, not so much over the $ but more so the wasted time and effort. By the way it’s 5’ from my zwave controller which is a hubitat element. I had to pick one star because no stars is not an option.Update 06/16/19New unit arrived promptly and worked.
N**G
Failure
worked well for a about 6 months and then it got fried. Had it setup switching ice melt wire when the weather was bad through a smart things hub. Install instructions were terrible and had 2 different electricians fall at installing it, but eventually got it setup. As stated it worked for 6 months and then failed. Load was about 14amps on single circuit. So I ended up just bypassing and going back to using the breaker as a switch. tried to switch to the second circuit but fried board must have affected this also.
D**L
Love it after figuring it out! Update 5 years later: Buy it, its working still great
I was hesitant at first to order this because of all of the problems connecting, DEAD ON ARRIVALS and other issues noted on the ratings. Since I've had great return service with Amazon in the past, I thought I would give it a try. I installed it and I know a lot about electricity, but as noted in the ratings, the install instructions are confusing. I did not apply power for at least a week, reading every blog and checking out YouTube. Finally deep in a website I found full in color schematics of every possible way to connect this unit in 1 phase, 3 phase,120volt, 220volt and so on. It's rather simple, 2 left connections are power for Zwave while 4 right screws are for floating connections that are controlled. One other thing, make sure no objects are in the way between zwave controller and timer except a wall. I had a box there, and it took me 5 tries to link up and then it failed to be recognized once a day. I removed box ( had a metal light in box) and it's perfect every time. Hope this helps, if I find that site with schematics again, I will note here as well.5 year update: this product is worth every penny. It has never failed to work and I have been through 3 Zwave hubs, now using Samsung smart things.
Trustpilot
Hace 1 mes
Hace 1 mes